This n8n telegram bot tutorial shows you things most people don’t realize are possible: text a message to trigger an automation, get AI-generated answers sent directly to your phone, or approve AI output before it gets published — all without writing any code.
This n8n telegram integration tutorial shows that Telegram is more than a messaging app — it’s a two-way communication layer for your workflows. You can send Telegram messages from any node, receive messages as workflow triggers, and even use Telegram as a human-in-the-loop checkpoint to review and approve workflow output before it continues.
This n8n telegram bot tutorial covers everything from bot creation with BotFather to the three main patterns: Telegram as an assistant, Telegram as a human-in-the-loop tool, and Telegram as an AI agent tool. If you’re new to n8n, check the n8n beginner guide first
What Is an n8n Telegram Bot?
The n8n telegram bot integration connects a Telegram bot to n8n via the Telegram node. Once connected, you can use Telegram messages to trigger workflows, send automated messages from inside a workflow, or pause a workflow and wait for a human approval response.
Telegram bots — and telegram n8n workflows — are automated accounts that send and receive messages via an API. They’re created through BotFather, Telegram’s official bot management tool, which gives you an API token. You paste that token into n8n to authenticate the connection.
For new n8n users, check out this n8n beginner guide before getting started.
The n8n telegram integration includes 24 actions and 9 triggers, covering everything from sending text messages and files to managing chats and responding to callback queries.
How to Set Up a Telegram Bot for n8n
Setting up a Telegram bot takes about 5 minutes. You need a Telegram account on your phone, the Telegram desktop app, and access to BotFather. Here’s the full process.
Step 1: Create a Telegram Account and Install the Desktop App
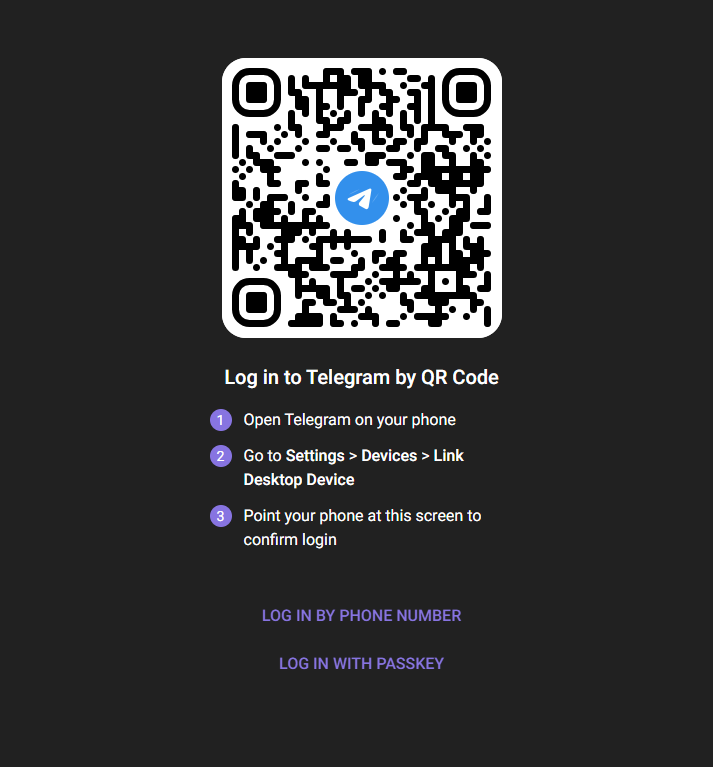
Create a Telegram account on your phone first — you’ll need it to verify the desktop app. Then download the Telegram desktop app at desktop.telegram.org and install it.
When you open the desktop app, scan the QR code with your phone (Settings > Devices > Link Desktop Device). This connects your phone account to the desktop app.
Step 2: Create a Bot with BotFather
BotFather is Telegram’s official bot creation tool. Search for @BotFather — see the n8n telegram trigger node documentation for the direct link from n8n Telegram node documentation. Open the chat and click Start.
Type /newbot (or click the command link). BotFather will ask for a display name (what users see) and a username (must end in ‘bot’, like my_automation_bot). After confirming both, BotFather will give you the bot’s API token.
Copy that token — you’ll paste it into n8n in the next step. If you lose it, you can regenerate it at any time by messaging /token to BotFather.

Step 3: Add Telegram Credentials in n8n
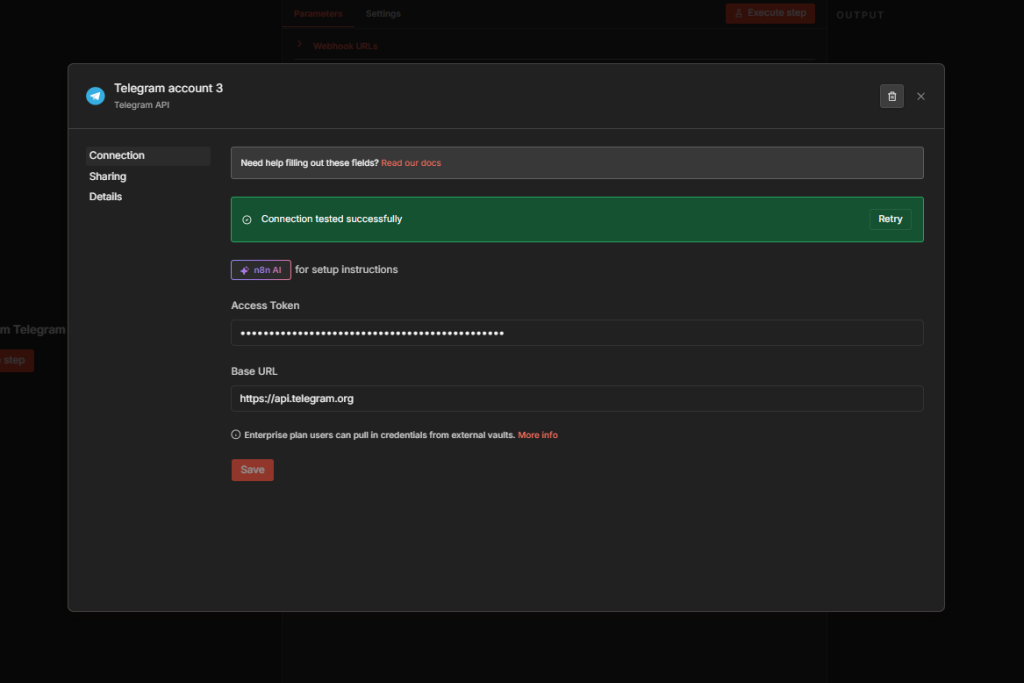
For n8n telegram node setup: add any Telegram node to your canvas. Click the credential dropdown and select Create New Credential. Paste in the API token from BotFather and click Save.
After n8n telegram node setup, n8n will test the connection immediately. A ‘Connection tested successfully’ message confirms it’s working. Rename the credential to match the bot name so you can tell them apart if you manage multiple bots.
For n8n telegram trigger node configuration — one n8n telegram trigger setup note: due to Telegram’s API design, you can only have one active trigger per bot at a time. If you need multiple trigger workflows, create separate bots for each one.
n8n Telegram Triggers: 9 Ways to Start a Workflow
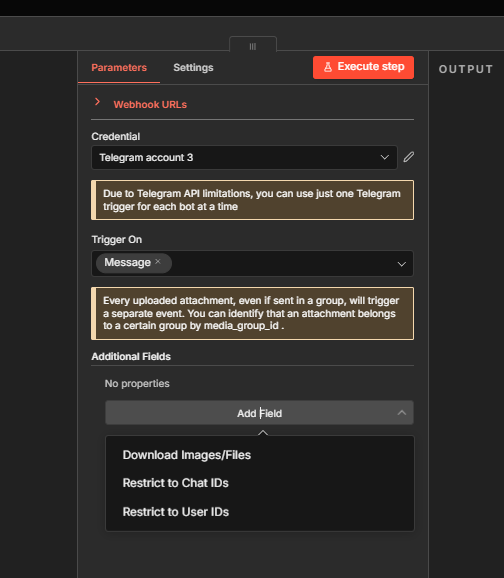
The n8n telegram trigger node has 9 triggers. The most commonly used is On Message, which fires whenever a user sends a text message to your bot. Other triggers include On Callback Query (for inline button responses), On Channel Post, On Inline Query, and more specialized ones for payments and shipping.
The n8n telegram trigger node docs list all 9 — to find them, click the plus button, search ‘Telegram’, and scroll to Triggers at the bottom. Triggers have a rounded left edge and a lightning bolt icon.
Join Our AI Community
The n8n telegram trigger node documentation covers (see n8n telegram trigger node docs for full details): the On Message trigger gives you options to restrict it to specific chat IDs or user IDs — useful if you want a personal bot that only responds to your messages. You can also enable file and image downloads if your workflow needs binary data from attachments.
Compared to a standard n8n webhook,
Telegram triggers are simpler to set up — no URL configuration or SSL required. The bot handles the connection automatically.
How to Get Your Telegram Chat ID in n8n
To send a Telegram message from n8n, you need a Chat ID — the unique identifier of the conversation you want to send to. Here’s the easiest way to get it.
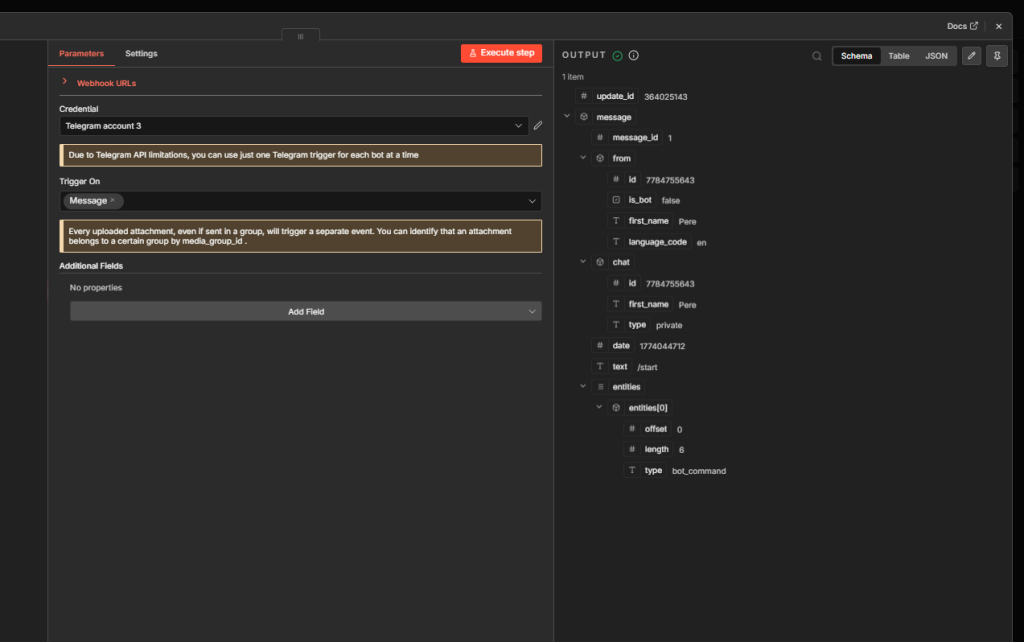
Add a telegram bot node — a Telegram trigger (On Message) — to your workflow. Start your bot in Telegram by sending it a message. Execute the workflow in n8n. The trigger output will include a field called ‘id’ inside the ‘chat’ object — that’s the Chat ID.
Per n8n telegram node send message documentation: hardcode the Chat ID in your n8n telegram node send message action for personal bots, or pass it dynamically using an expression when you’re building workflows that respond to the person who triggered them: {{ $(‘Telegram Trigger’).item.json.message.chat.id }}
Workflow Pattern 1: Telegram as an AI Assistant
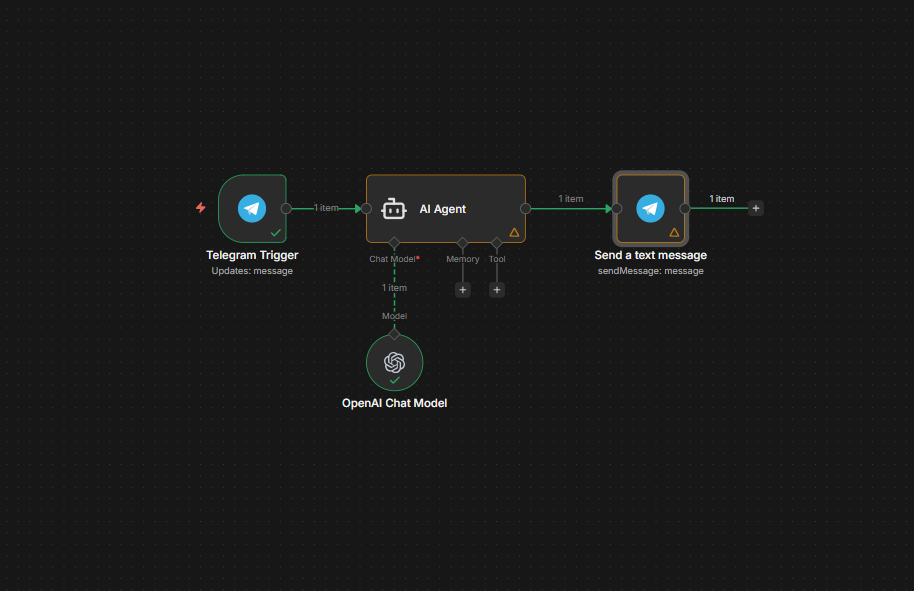
This n8n telegram bot integration tutorial covers the most popular pattern. A user sends a message to the bot, an AI agent processes it, and the answer is sent back as a Telegram message.
Node setup (n8n telegram node send message example): n8n telegram send message node workflow — Telegram Trigger (On Message) → AI Agent (with the user’s message as input) → Telegram: Send Text Message (with the AI agent output and the Chat ID from the trigger).
In the AI Agent node (for a detailed walkthrough on setting this up, see our guide on the n8n AI agent), connect the user’s message using an expression that pulls from the trigger output: {{ $('Telegram Trigger').item.json.message.text }}. This passes whatever the user typed directly to the model.
Per the n8n telegram node send message documentation: pass the Chat ID dynamically from the trigger so responses go back to whoever sent the message. Set the Text field to the AI agent’s output: {{ $('AI Agent').item.json.output }}.
Workflow Pattern 2: Telegram as a Human-in-the-Loop Reviewer
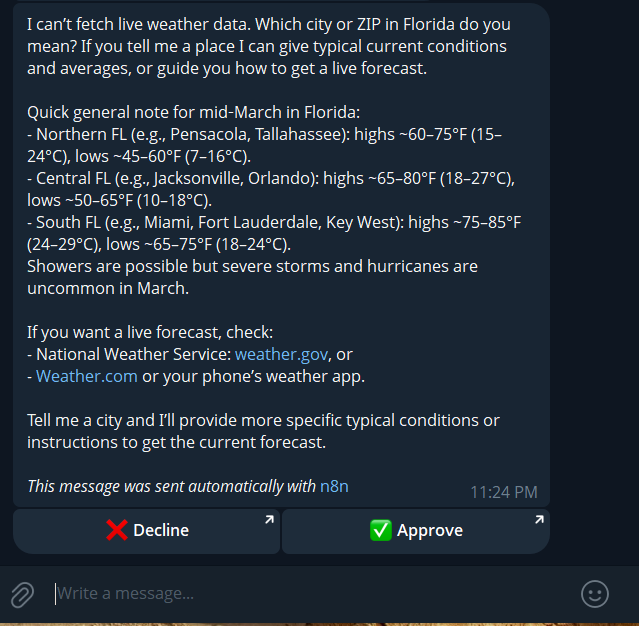
The n8n telegram trigger node documentation describes the human-in-the-loop pattern, which uses Telegram to pause a workflow and wait for your approval before it continues. This is useful for reviewing AI-generated content, images, emails, or reports before they’re published or sent.
The pattern works like this: your workflow generates output (from an AI agent, image tool, or any other source) → a Telegram Send Message node delivers that output to your phone → the workflow pauses and waits → you click Approve or Reject in Telegram → the workflow resumes based on your response.
Setting Up the Approval Step
The n8n telegram node documentation explains: in the Send Message node, set the Response Type to ‘Approval.’ n8n will add Approve and Reject buttons to the message sent to your phone.
The n8n telegram node docs explain: when you click Approve, n8n receives a callback with approved: true. When you click Reject, it receives approved: false. The workflow then continues from the Send Message node’s output.
After the approval step, add an If node. Set the condition to: the value of approved is equal to true (boolean). Connect the true branch to the actions you want to run on approval (send email, publish content, create task). Connect the false branch to your error handling or fallback logic.

When to Use Human-in-the-Loop
The n8n telegram trigger node docs suggest: use the approval pattern whenever the stakes are high: sending emails to clients, publishing website content, posting to social media, or executing financial transactions.
It’s especially valuable for AI-generated outputs. Even if your AI agent is accurate 95% of the time, that 5% can be a significant problem for customer-facing content. A 30-second Telegram review prevents a bad output from going live.
Using Telegram as a Tool in an n8n AI Agent
Per the n8n telegram node docs, you can attach the Telegram node as a tool inside an AI agent. This lets the agent decide when to send a Telegram message based on the conversation or task at hand, rather than following a fixed workflow path.
The n8n telegram send message docs explain how to add it: open the Tools section of your AI agent node and search for ‘Telegram.’ Select the resource (Message) and operation (Send Message), then configure the chat ID and text fields.
The tool description field is critical — fill it in with clear instructions about when the agent should use this tool and what it should send. Without a good description, the model may call the tool unnecessarily or format the message incorrectly.
The n8n telegram node documentation recommends: for most workflows, a structured fixed-node approach (Trigger → Agent → Send Message) is more reliable than using Telegram as a tool. Use the tool approach only when the decision of whether or when to send a message needs to be dynamic.
Frequently Asked Questions
How do I create a Telegram bot for n8n?
Per the n8n telegram node documentation: open Telegram and search for @BotFather. Send /newbot, give your bot a display name and a username ending in ‘bot.’ BotFather will generate an API token. Paste that token into a new Telegram credential in n8n. The connection test confirms it’s working.
How do I find my Telegram chat ID in n8n?
The n8n telegram node send message documentation explains: add a Telegram Trigger (On Message), send a message to your bot, then execute the workflow. The trigger output includes a ‘chat.id’ field — that’s your Chat ID. Use it in the Send Text Message node’s Chat ID field. For dynamic workflows, use the expression {{ $(‘Telegram Trigger’).item.json.message.chat.id }}.
What is human-in-the-loop in n8n Telegram?
Human-in-the-loop in n8n telegram integration means pausing a workflow to send a message to Telegram and wait for your approval before continuing. In the Telegram Send Message node, set Response Type to ‘Approval.’ n8n sends the message with Approve/Reject buttons. When you tap one, the workflow resumes with the result (approved: true or false) and branches accordingly.
Can I use Telegram to trigger n8n workflows?
Yes. Per the n8n telegram trigger node documentation, there are 9 trigger types, with On Message being the most common. When a user sends a message to your bot, n8n starts the workflow automatically. You can restrict which users or chats can trigger it using the User IDs and Chat IDs filter options.
Why is there a delay in the Telegram trigger in n8n?
The n8n telegram node docs note: triggers use polling, not webhooks, by default. This means n8n checks for new messages on a schedule rather than receiving them instantly. There can be a 1-3 minute delay between when a message is sent and when n8n picks it up. When your workflow is active (in production mode), it polls automatically. In manual test mode, you need to execute the workflow to fetch the latest messages.
Your Next Step: Build the Telegram Reminder Bot
The n8n telegram send message docs and three Telegram patterns covered here — assistant, human-in-the-loop reviewer, and AI agent tool — cover the vast majority of real-world Telegram automation use cases. The core setup is always the same: create a bot with BotFather, paste the API token into n8n, and find your Chat ID from the trigger output.
The challenge for this tutorial is a reminder bot. A user texts the n8n telegram bot something like ‘remind me in 2 hours to check the oven.’ The workflow parses the message, sets a Wait node for the specified time, then sends the reminder back. It requires combining the Telegram trigger, a time parsing step, the n8n Wait node, and the Send Message node.
JSON workflow files for the AI assistant and human-in-the-loop patterns are available free in the Skool community. Post your reminder bot workflow there for a review.
