n8n Text Classifier Node: Step-by-Step 2026 Tutorial
The n8n Text Classifier node lets you automatically sort text into categories using AI. Instead of writing complex conditional logic or training your own model, you define a list of categories with descriptions, and the node uses a large language model to decide which category fits each piece of text.
This guide covers everything you need to know: how the node works, how to configure categories and system prompts, three real workflow examples, how to handle edge cases like multiple matches or spam, and when to use Hugging Face pre-trained models instead for better accuracy.
What Is the n8n Text Classifier Node?
The n8n Text Classifier node automatically categorizes text into predefined labels or classes based on its content. It is one of the AI cluster nodes in n8n and requires a chat model (such as GPT-4o Mini or Claude) to perform the classification.
Quick Definition: The Text Classifier node takes a piece of text and assigns it to one or more categories you define. You provide the category names and descriptions; the LLM reads the text and decides which category it belongs to. The node outputs items to different branches based on the classification result.
Common use cases include customer support ticket routing, email filtering (important vs. promo vs. spam), content moderation, lead qualification, and news article topic tagging.
Text Classifier vs. Sentiment Analysis Node
Sentiment analysis is a specific type of text classification (positive vs. negative). n8n has a dedicated Sentiment Analysis node for this purpose. Use the Sentiment node when you only need positive/negative/neutral scoring. Use the Text Classifier when you need custom categories like “billing question” or “feature request”.
Both nodes use the same underlying AI, but the Sentiment node is pre-configured for emotional tone, while the Text Classifier lets you define any categories you want.
How to Set Up the n8n Text Classifier Node
Finding the Node
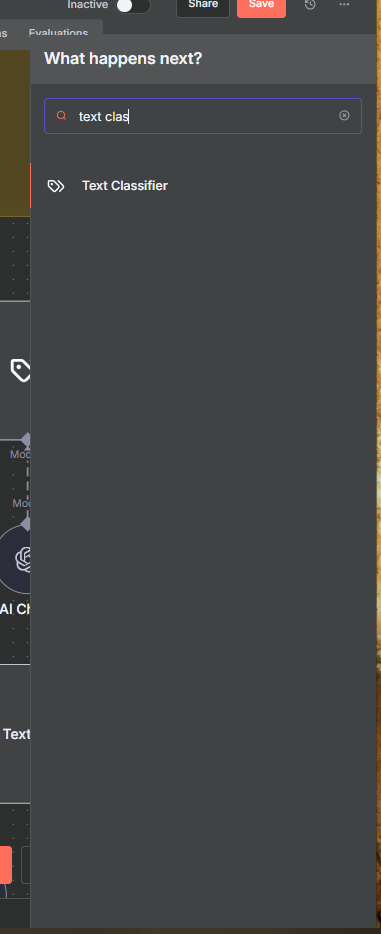
To add the Text Classifier node to your workflow, search for “text classifier” in the node panel. You can also find it under AI > Text Classifier. The node description reads “Classify your text into distinct categories.”
The node requires a connected Chat Model sub-node to work. After adding the Text Classifier, connect a model like OpenAI GPT-4o Mini, Anthropic Claude, or Google Gemini. For most classification tasks, a smaller model like GPT-4o Mini is fast and cost-effective.
Configuring the Input Text
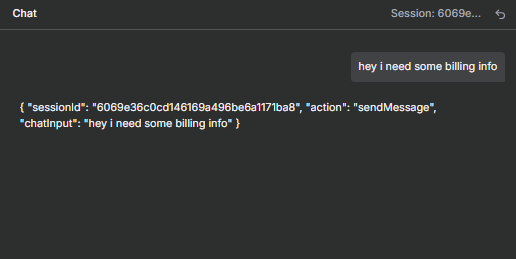
The top field in the node is where you specify what text to classify. You can type static text directly, or use an expression to pull text from a previous node. For example, to classify a chat message, use: {{ $json.chatInput }}
For data coming from a form, webhook, or Google Sheets row, reference the specific field. Any text-based data from the previous node can be fed into the classifier.
Defining Categories
Categories are the buckets your text will be sorted into. Each category needs two things: a name and a description. The name appears on the output branch. The description tells the LLM what belongs in that category.
The description is the most important part. Vague descriptions lead to misclassification. The more specific and detailed your description, the more accurate your results will be. For example, instead of “questions about money”, write “questions about payment, invoices, subscriptions or pricing”.
Customizing the System Prompt
The node comes with a default system prompt. You should always customize it to add context about your specific use case. For example, for a customer support use case, add: “You are routing customer support questions.” at the start.
The system prompt uses a {categories} placeholder that automatically gets replaced with your defined category names and descriptions at runtime. Keep this placeholder in your modified prompt.
Join Our AI Community
Example 1: Customer Support Ticket Routing
This is the most common use case for the Text Classifier node. The goal is to automatically route incoming support messages to the right team or trigger the right automated response.
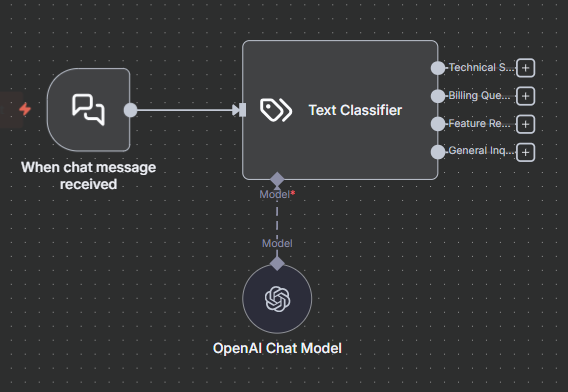
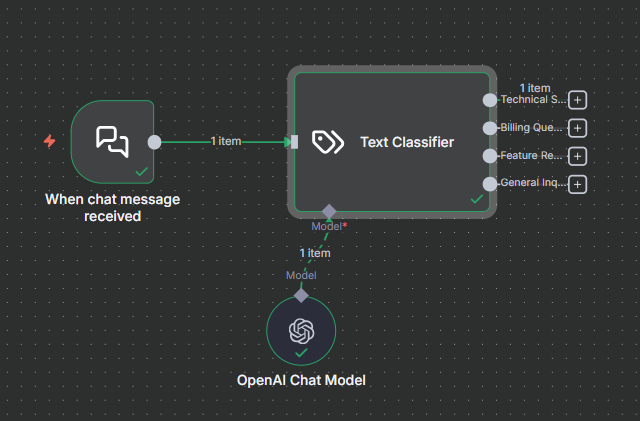
Here is the workflow setup:
- Chat Trigger or Webhook receives the incoming message
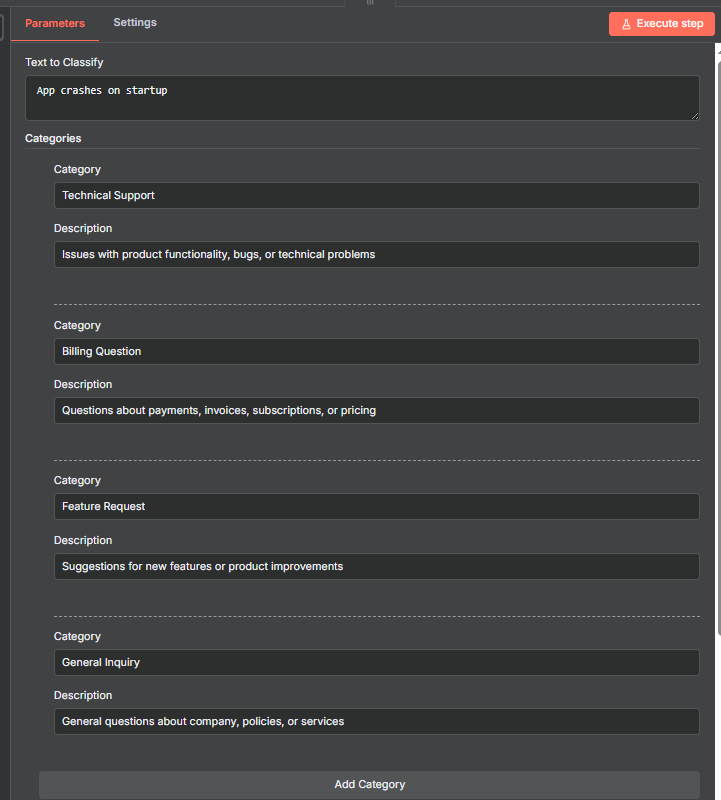
- Text Classifier node with 4 categories: Technical Support, Billing Questions, Feature Requests, General Inquiry
- Each output branch leads to a different action (Slack message, email, auto-reply, etc.)
Category configurations that work well:
- Technical Support: Issues with product functionality, bugs or technical problems
- Billing Questions: Questions about payment, invoices, subscriptions or pricing
- Feature Requests: Suggestions for new features or product improvements
- General Inquiry: General questions about company policies or services
Example inputs and where they route:
- “App crashes on startup” → Technical Support
- “When is my next payment due?” → Billing Questions
- “Please add mobile app support” → Feature Requests
- “What hours are you open?” → General Inquiry
When a message does not fit neatly into one category, the quality of your descriptions determines accuracy. If you get misclassifications, add more specific language to the description and update the system prompt with clarifying rules.
Example 2: Allow Multiple Classes to Be True
By default, the Text Classifier assigns each piece of text to exactly one category. But some content naturally fits multiple categories at once. For example, “Webinar today: learn about our new features” is educational, promotional, time-sensitive, AND product-related all at once.
To enable this, open the Options section of the node and toggle on “Allow Multiple Classes to Be True”. When active, the node can output to multiple branches for a single input item.
Example categories for an email classification workflow:
- Educational: content that teaches or informs
- Promotional: content that markets or sells something
- Time-Sensitive: content that references a deadline or urgency
- Product-Related: content about a specific product or feature
Test results:
- “Webinar today: learn about our new features” → Educational, Promotional, Time-Sensitive, Product-Related (all four)
- “Sale ends tonight at midnight” → Promotional, Time-Sensitive
- “How to set up your first workflow” → Educational only
Define categories with clear boundaries if you want single-class outputs. Use more permissive descriptions if you expect and want overlap.
Example 3: Handling No Clear Match (Discard vs. Other Branch)
Not every input will fit neatly into your defined categories. The Text Classifier gives you two ways to handle this.
Option 1: Discard the Item
When “Discard Item” is selected, any text that does not match a category is silently removed from the workflow. Nothing flows downstream. This is useful when you only want to process relevant inputs and ignore everything else.
Option 2: Route to an “Other” Branch
When “Output on Extra Other Branch” is selected, unmatched items route to a separate output branch labeled “Other”. This lets you handle edge cases explicitly, for example by flagging them for manual review.
Email filtering example:
- Categories: Important, Promo, Social Update
- Input: “Free money. Click here.” (spam)
- With Discard Item: the spam email is dropped and nothing flows downstream
- With Other Branch: the spam routes to the Other output for manual review
If items keep routing to the wrong category, add a clarifying rule to your system prompt. For example: “If the email looks spammy or unsolicited, treat it as no match.” This gives the LLM a clear instruction for edge cases that might otherwise bleed into your categories.
Using Hugging Face Models for More Accurate Classification
The built-in Text Classifier node uses a general-purpose LLM. This works well for most use cases, but if you need higher accuracy for a specific domain, pre-trained models from Hugging Face can outperform general LLMs.
Hugging Face hosts over 100,000 text classification models trained on specific datasets: SMS spam detection, toxic comment moderation, news topic classification, financial sentiment, and more. These models are fine-tuned on domain-specific data, which makes them more accurate than asking a general LLM to classify the same content.
Setting Up Hugging Face in n8n
You call Hugging Face models via the n8n HTTP Request node using Hugging Face’s Inference API. Here is how to set it up:
- Go to Hugging Face, navigate to NLP > Text Classification, and filter models by your use case and language
- Find a model with a good download count and click on it to view its page
- Find the curl example (usually under “Use via API”) and copy it
- In n8n, add an HTTP Request node and click “Import from cURL”, then paste the curl command
- In the HTTP Request node settings, add predefined authentication and select “Hugging Face” as the credential type
- Add your Hugging Face API token as a credential in n8n
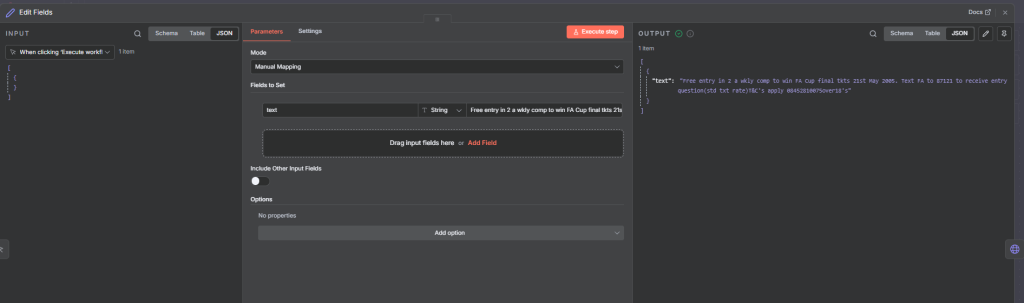
- In the JSON body, replace the static text input with a dynamic expression referencing the field you want to classify
When to Use Hugging Face vs. the Built-In Node
Start with the built-in Text Classifier node. If accuracy is not good enough for your specific use case, look for a fine-tuned Hugging Face model trained on similar data. Hugging Face models return a label and a confidence score, which lets you set thresholds for how confident the model needs to be before acting on a classification.
The built-in node is much easier to set up. The Hugging Face approach takes more configuration but can be significantly more accurate for domain-specific tasks like SMS spam detection or financial document classification.
Frequently Asked Questions
What models can I use with the n8n Text Classifier node?
Any chat model supported by n8n works with the Text Classifier node. This includes OpenAI (GPT-4o, GPT-4o Mini), Anthropic (Claude Haiku, Claude Sonnet), Google (Gemini Flash, Gemini Pro), and others. GPT-4o Mini and Claude Haiku are popular choices since they are fast and inexpensive for classification tasks.
How many categories can I define in the Text Classifier node?
There is no hard limit. However, more categories means more potential for misclassification, especially if categories overlap. Keep descriptions distinct and specific. For workflows with many categories, consider a two-stage approach: a broad first pass, then a more specific second pass within each bucket.
Why is the n8n Text Classifier putting text in the wrong category?
The most common cause is category descriptions that are too vague or too similar to each other. Improve accuracy by making descriptions more specific, adding examples of what belongs in each category, and updating the system prompt to add context about your use case. You can also switch to a more capable LLM model.
Can I use the Text Classifier node without OpenAI?
Yes. The Text Classifier works with any compatible chat model in n8n. You can connect it to Claude, Gemini, Mistral, or any locally-hosted model that n8n supports.
What is the difference between the n8n Text Classifier and an n8n AI Agent for classification?
Both can classify text, but the Text Classifier node is purpose-built for it. It automatically handles output formatting, generates the correct JSON output, and creates output branches for each category without extra setup. An AI agent can do the same task but requires you to define the output structure manually. Use the Text Classifier for classification tasks and the AI agent for more complex workflows that need tools or multi-step reasoning.
Next Steps
Now that you understand the n8n Text Classifier node, here is where to go next:
- Build a customer support routing workflow using the Chat Trigger as your input and the Text Classifier to route messages to different Slack channels or automated response templates.
- Try the “Allow Multiple Classes” option for content tagging, where a single piece of content might fit multiple categories.
- Experiment with the system prompt. Small changes to how you frame the classification task can significantly improve accuracy.
- If accuracy matters a lot for your use case, browse Hugging Face for a domain-specific text classification model and connect it via the HTTP Request node.
- Combine the Text Classifier with a n8n Webhook node to build a real-time classification pipeline that processes incoming data as it arrives.
The Text Classifier node is one of the fastest ways to add intelligent routing to an n8n workflow without writing custom code. Start simple with a few well-defined categories and expand from there.
