How to Scrape Instagram Profiles from Hashtags Using n8n and Apify
Instagram scraping is one of the most in-demand automation tasks for e-commerce brands, influencer marketing platforms, and agencies. The ability to search a hashtag, pull everyone who’s posted under it, and get their full profile data — follower count, bio, whether the account is public — opens the door to powerful lead generation and influencer discovery workflows.
In this tutorial we’ll build a complete n8n workflow that does exactly that. Enter a hashtag, and the workflow automatically scrapes the posts, extracts the creator usernames, profiles each creator, filters by follower count and public/private status, and outputs a clean lead list to Google Sheets — all without writing code (except one small Python snippet for formatting).
This workflow requires two Apify actors working in sequence: an Instagram Hashtag Scraper to pull posts and usernames, and an Instagram Profile Scraper to get full account data for each username. Links to both actors are in the video description.

Workflow Overview: Two Actors, One Pipeline
Before diving into each node, here’s the complete pipeline at a glance. The workflow consists of seven steps that chain two Apify actors together:
- Form Trigger — enter a hashtag to research (e.g.,
sportscards) - Actor 1: Instagram Hashtag Scraper — finds all posts tagged with that hashtag and returns post metadata including the creator’s username
- Get Dataset Items — retrieves the scraped posts from Apify’s output dataset
- Edit Fields — extracts just the
ownerUsernamefrom each post - Code Node — formats the list of usernames into the structure Actor 2 expects
- Actor 2: Instagram Profile Scraper — takes the username list and fetches full profile data for each one
- Edit Fields + Filter + Google Sheets — cleans up the profile data, removes private/small accounts, and writes leads to a spreadsheet
Why two actors? Instagram’s data is structured such that hashtag posts and profile details live in separate endpoints. The hashtag actor tells you who posted; the profile actor tells you everything about them. This two-actor pattern is standard for any Instagram scraping workflow that starts from hashtag discovery.
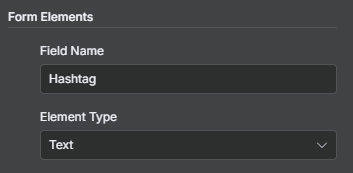
Step 1: Form Trigger — Enter Your Hashtag
The workflow starts with an n8n Form Trigger node. This creates a simple web form with a single text field labeled “Hashtag” where you type the topic you want to research. Submit the form and the workflow begins automatically.
The hashtag flows into the first Apify actor as a dynamic input. You can enter the hashtag with or without the # symbol depending on what the actor expects — check the actor’s input documentation to confirm the format.
Note from the video: At the time of recording, the n8n Form Trigger was experiencing a bug that prevented it from rendering properly. If you encounter this, you can work around it by using the “Edit Output” option on the node to manually inject the hashtag as a JSON value: {"hashtag": "sportscards"}. Pin that data and the rest of the workflow runs normally. This is a temporary workaround — the standard form approach works in stable n8n releases.
For production deployments, consider replacing the Form Trigger with a Schedule Trigger that loops through a list of hashtags stored in Google Sheets — giving you a fully automated, hands-off pipeline.
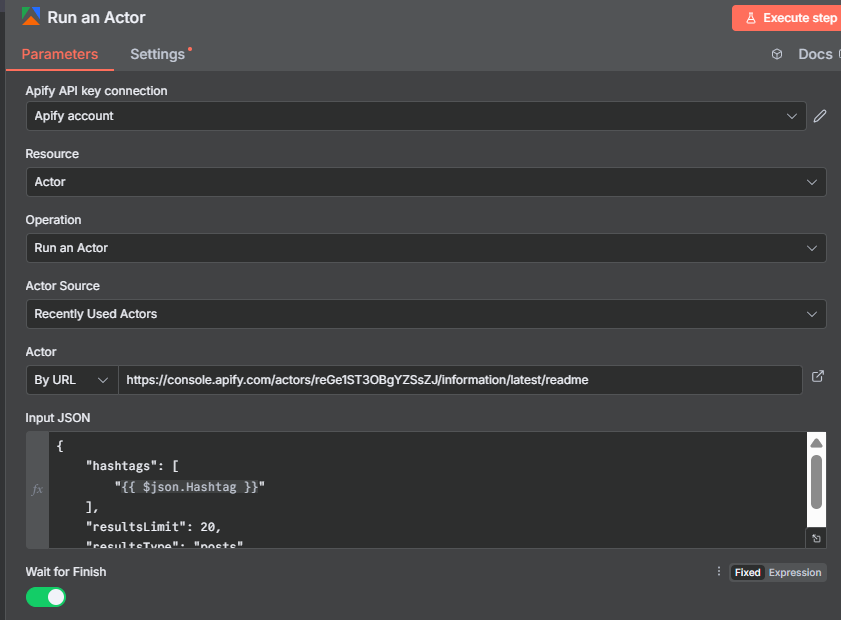
Step 2: Actor 1 — Instagram Hashtag Scraper
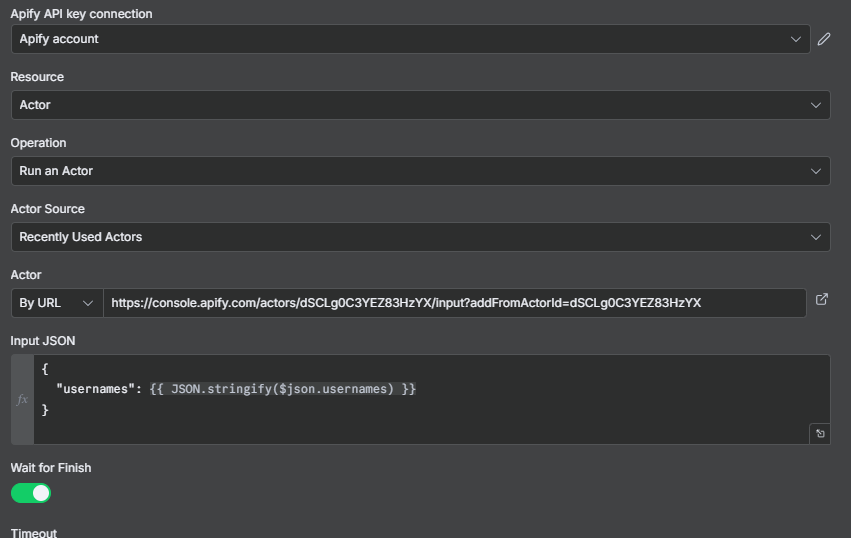
The first Apify node uses the Instagram Hashtag Scraper actor. This actor searches Instagram for a given hashtag and returns a list of recent posts associated with it — including post URLs, captions, like counts, and crucially, the owner username of each post’s creator.
Configure the Apify node:
- Resource: Actor
- Operation: Run Actor (the combined “Run Actor and Get Dataset” operation works here, but in this workflow we use separate nodes to show the explicit steps)
- Actor Source: By URL — paste the actor URL from the Apify console (
console.apify.com/actors/...) - Input JSON: Start from the actor’s example input and inject your hashtag dynamically
The input JSON looks like:
{
  "hashtags": ["{{ $('Form Trigger').item.json.hashtag }}"]
}
The actor accepts multiple hashtags in the array — useful if you want to research several topics in a single run. For this tutorial we use one. Run the actor and you’ll get back 20+ posts from Instagram for that hashtag.
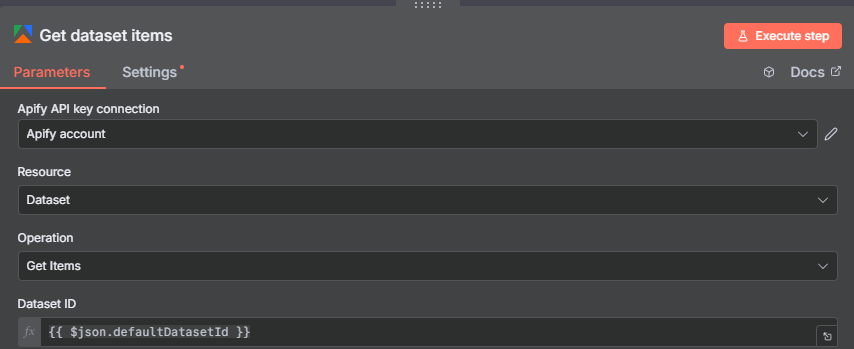
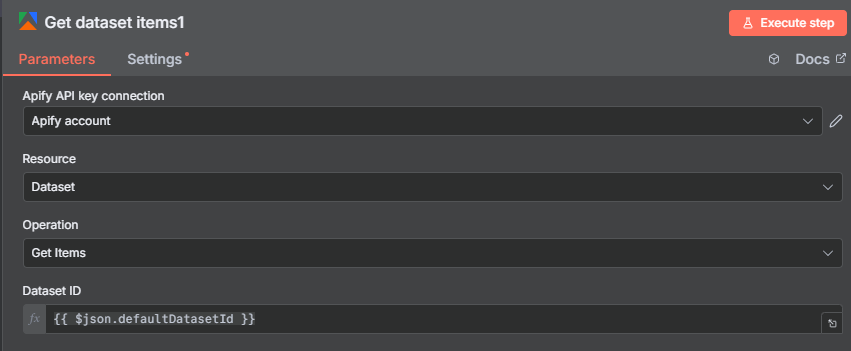
Step 3: Get Dataset Items — Retrieving the Hashtag Posts
After the Run Actor node completes, add a Get Dataset Items node to retrieve the actual post data. The actor stores results in a dataset — you need to fetch it separately using the dataset ID from the Run Actor output.
The dataset ID is tucked away inside the Run Actor’s output JSON. Scroll down through the output and look for the defaultDatasetId field. Drag that field into the Get Dataset Items node’s Dataset ID input, or reference it with: {{ $json.defaultDatasetId }}.
Once you execute the Get Dataset Items node, you’ll see one item per post — each containing the full post metadata from Instagram. The field you need most is ownerUsername, which identifies who created each post. Everything else (captions, likes, post URLs) is available too if you want to include it in your output.
Tip: Pin the output of this node after the first successful run. This lets you build and test all the downstream nodes without re-running the Apify actor and spending more credits.
Step 4: Edit Fields — Extract the Creator Usernames
At this point you have 20+ post items, each with a full data payload. Most of that data isn’t needed for the next step — you only need the ownerUsername field to know whose profile to look up.
Add an Edit Fields node and map a single field:
- Username:
{{ $json.ownerUsername }}
You can find the ownerUsername field by scrolling through the pinned sample output from the previous node. In n8n, you can drag and drop the field directly into the Edit Fields mapping instead of typing the expression — just find it in the data panel and drag it over.
After this node you’ll have 20 items, each containing just a single username — the person who posted under your hashtag. These usernames are the input to Actor 2 in the next step.
Step 5: Code Node — Formatting Usernames for Actor 2
The Instagram Profile Scraper (Actor 2) expects usernames as a JSON array: ["username1", "username2", "username3", ...]. The 20 separate items coming out of the Edit Fields node aren’t in that format yet — they need to be collected and structured into a single list.
Add a Code node (set to Python mode) with this list comprehension:
return [{"usernames": [item["json"]["Username"] for item in items]}]
This takes all the individual username items and merges them into a single output item containing a usernames array — exactly the format the Profile Scraper expects.
Note on duplicates: If the same user posted the hashtag multiple times, their username will appear in the list more than once. The Profile Scraper will run against the same account twice, wasting credits. To avoid this, add a Remove Duplicates node before the Code node, comparing on the Username field. This ensures each person is only profiled once per workflow run.
After the Code node, you’ll have a single item with a usernames array containing all the unique creators found under your hashtag.
Step 6: Actor 2 — Instagram Profile Scraper
Now run the second Apify actor: the Instagram Profile Scraper. This actor takes a list of Instagram usernames and returns full profile data for each one — follower count, bio, post count, whether the account is private, and much more.
Add another Apify node and configure it the same way as Actor 1 — Apify credentials, actor source by URL (using the Profile Scraper’s URL from the Apify console), and the input JSON:
{
  "usernames": {{ $json.usernames }}
}
The usernames array flows in from the Code node’s output. The actor runs in Apify and returns one profile record per username.
Important: Make sure “Wait to finish” is enabled on this node. By default it may be set to fire-and-forget, which means n8n won’t wait for the actor to complete before moving to the next step. Enable “Wait to finish” so the workflow pauses until all profiles have been scraped.
After this node runs, add another Get Dataset Items node using the defaultDatasetId from this actor’s output — same pattern as Step 3.
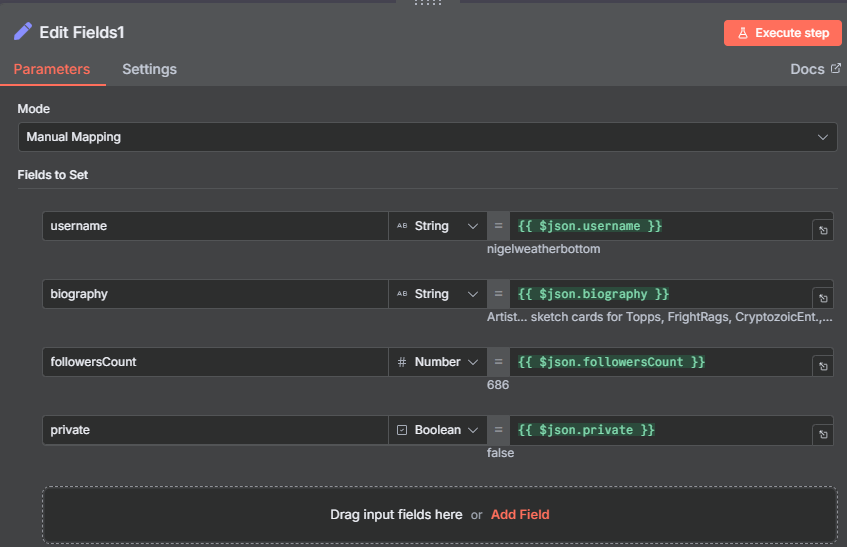
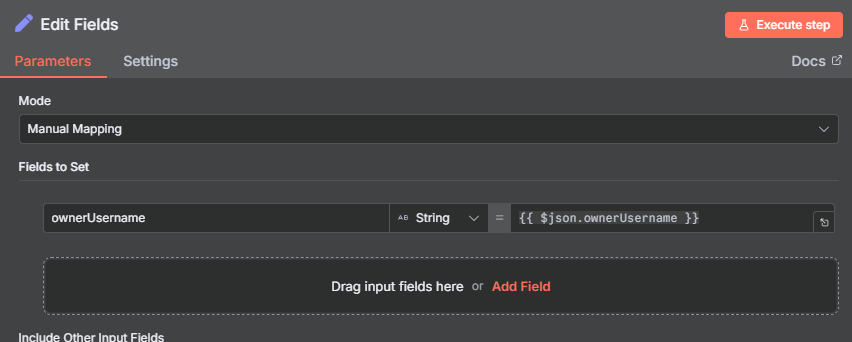
Step 7: Edit Fields — Extract Profile Data
The Instagram Profile Scraper returns a rich payload for each account — far more fields than you need for a lead list. Add an Edit Fields node to extract just the relevant profile data:
- Username:
{{ $json.username }} - Bio:
{{ $json.biography }} - Followers:
{{ $json.followersCount }} - Private:
{{ $json.private }}(boolean —truemeans the account is private)
The private field is important for the next step — you’ll use it as a filter condition. Including it here means it’s available downstream even though it won’t appear in the final Google Sheets output.
As always with Apify data, drag and drop the fields from the sample output panel rather than typing expressions. The field names can vary slightly between actor versions, so confirming them from live output is more reliable than guessing.
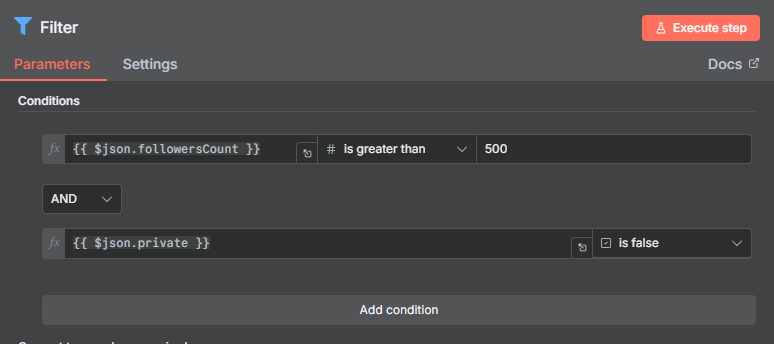
Step 8: Filter — Remove Private and Small Accounts
Before writing to Google Sheets, filter the profiles down to the leads worth pursuing. Add a Filter node with two conditions joined by AND logic:
Condition 1 — Minimum followers:
- Field:
Followers - Operator: Greater than
- Value:
500 - Data type: Number (critical — change from the default “String” or comparisons will be wrong)
Condition 2 — Public accounts only:
- Field:
Private - Operator: Equals
- Value:
false - Data type: Boolean
The follower threshold removes nano accounts that won’t have meaningful reach. Adjust the threshold based on your use case — influencer marketing campaigns typically require 5,000–10,000+ followers, while local business prospecting might keep accounts as small as 200.
The private filter removes accounts you can’t reach or profile effectively. Private Instagram accounts won’t respond to cold DMs from strangers, and their content isn’t publicly visible for verification.
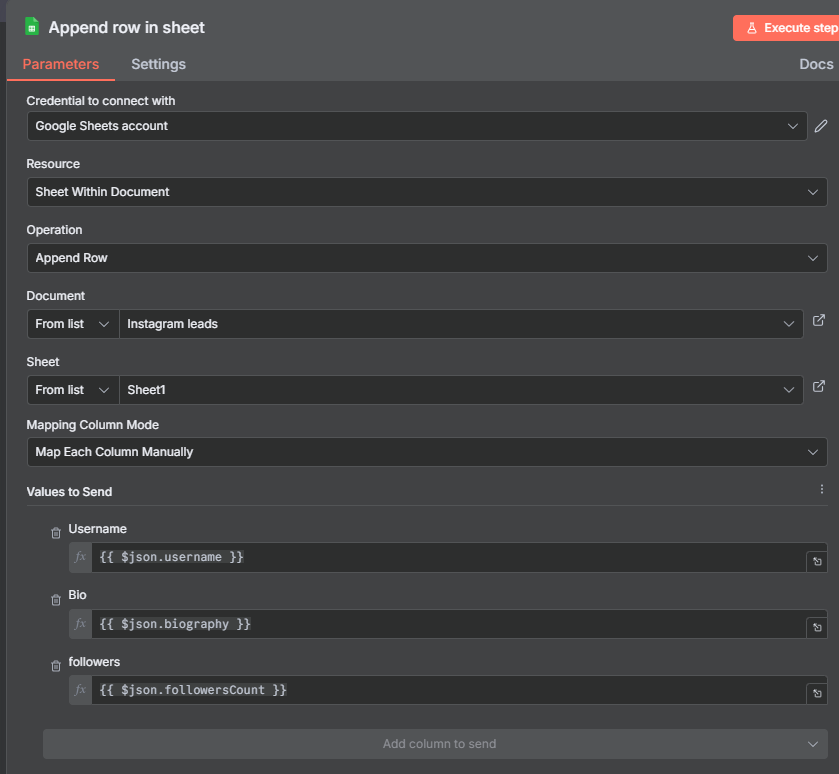
Step 9: Google Sheets — Building Your Instagram Lead List
The final node writes each filtered profile to a Google Sheet. Connect a Google Sheets node set to Append Row, point it at a spreadsheet called “Instagram Leads” (or whatever you like), and map three columns:
- Username → Column A
- Bio → Column B
- Followers → Column C
You don’t need the Private field in the sheet — it was only needed to power the filter. The remaining fields are all actionable: the username links you to the profile, the bio gives context for personalized outreach, and the follower count helps you prioritize your outreach sequence.
When you run the full workflow for the first time, you’ll see the sheet populate in real time as the Google Sheets node executes — one row per qualifying creator. In the example workflow, 20 raw posts from the hashtag filtered down to profiles with 500+ followers and public accounts.
Extending the Workflow
This workflow is a solid foundation. Here are several ways to build on it for more sophisticated use cases:
Add AI bio summarization: After the Profile Scraper Edit Fields node, pipe each bio through an AI Agent node. Ask it to classify the account type (individual creator, brand, reseller, etc.) or summarize the bio in 2–3 keywords. This enriches your lead list with intelligent categorization that would take hours to do manually.
Add a post count filter: The Profile Scraper also returns the number of posts (postsCount). Add a third filter condition to require accounts to have at least 10–20 posts — filtering out brand-new or inactive accounts that are unlikely to be active creators.
Research multiple hashtags: Store a list of target hashtags in a Google Sheet. Add a “Read Rows” node at the start and a Loop node to run the entire pipeline for each hashtag in sequence. This builds a comprehensive lead list across an entire niche in one run.
Deduplicate across runs: If you run the workflow weekly, the same creator may appear in multiple runs. Add a step that checks whether the username already exists in your leads spreadsheet before appending — preventing duplicate entries from accumulating.
Add email discovery: Some creators include their email in their bio field. Add a Code node with a simple regex to extract email addresses from bios where they’re present, and write them to a separate column in your sheet.
Use Cases for Instagram Hashtag Scraping
Influencer discovery: Search hashtags in your product niche and surface creators with engaged followings. Rather than manually browsing Instagram for hours, this workflow builds a candidate list in minutes — with follower counts ready for filtering.
Competitor audience research: Search hashtags associated with competitors’ products or communities. The creators posting under those hashtags are your competitor’s audience — potential customers who care about the space you compete in.
Affiliate partner prospecting: Find creators already posting about topics adjacent to your product. Their bios and follower counts let you quickly assess fit before reaching out with an affiliate partnership proposal.
Brand mention monitoring: Search hashtags or keywords associated with your brand. The workflow surfaces who’s talking about your product or category on Instagram — useful for community management and PR outreach.
Market research: Aggregate data across multiple hashtags over time to understand which topics are growing on Instagram, which creators are becoming more active, and where audience attention is shifting in your niche.
Tips, Troubleshooting, and Best Practices
Always use the native Apify n8n node. The older HTTP Request approach (posting directly to Apify’s API endpoint) still works but is more complex to configure and maintain. The native node handles authentication, input formatting, and dataset retrieval more cleanly. If you’re on an older workflow that uses HTTP Request for Apify, migrate it to the native node.
Pin data after each actor run. Apify actors cost credits. After a successful run, pin the output of both the Run Actor node and the Get Dataset Items node. This lets you develop and debug all downstream nodes without running the actor again.
Add Remove Duplicates before the Code node. If the same creator posts multiple times under a hashtag, you’ll scrape their profile multiple times. A Remove Duplicates node on Username before the Code node prevents this and saves credits on Actor 2.
Set data types correctly in the Filter node. Follower count must be Number (not String) for the greater-than comparison to work. Private must be Boolean. Getting these wrong produces silently incorrect filter results — the node runs without error but lets through the wrong records.
Enable “Wait to finish” on Actor 2. If this isn’t enabled, the workflow moves to the next step before Actor 2 has finished running, and the Get Dataset Items node returns empty results. Always ensure wait-to-finish is on for any actor that feeds into downstream nodes.
Start with a small test hashtag. Use a niche hashtag with fewer posts for initial testing — it runs faster and costs fewer credits. Once the workflow is verified end-to-end, switch to your target hashtag.
