n8n Webhook Node: Complete Guide (Trigger, Auth, Testing & More)
The n8n Webhook is the foundation of event-driven automation — and one of the most important nodes you’ll ever use. It lets an external application start your n8n workflow the instant something happens: a task completes, a form is submitted, a payment clears, a CRM record changes. No polling. No delay. Just real-time execution.
This is a complete guide to everything the n8n Webhook node can do. We cover both the Webhook trigger and the Respond to Webhook node, walk through 10+ practical examples, explain every setting, and show you how to build production-ready webhook workflows that are fast, secure, and debuggable.
What Is a Webhook? (And Why It Matters in n8n)
A webhook is a URL that listens for data. When an external app has something to tell n8n — a new contact was created, a form was submitted, a task changed status — it sends an HTTP request to your webhook URL with the relevant data. n8n receives that request and immediately starts your workflow.
The contrast with polling is important. A scheduled workflow checks for new data every 5 or 15 minutes. A webhook reacts the instant something changes. For anything time-sensitive — notifications, CRM syncs, payment processing, approval workflows — webhooks are the right tool.
When to use the raw Webhook node vs native triggers: Many apps already have native triggers built into n8n. HubSpot has 18 trigger events. Gmail has message-received triggers. Before building a webhook from scratch, search your app’s name in n8n’s trigger list. Only fall back to the raw Webhook node when no native trigger exists — like Monday.com, which has no native n8n integration but does support webhooks through its developer platform.
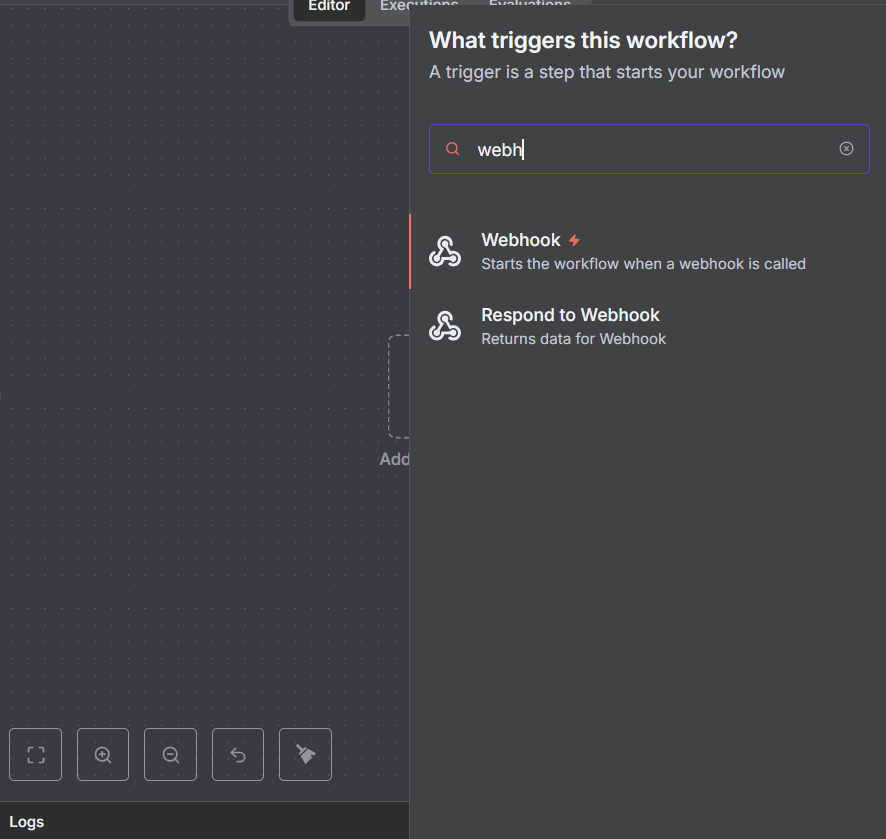
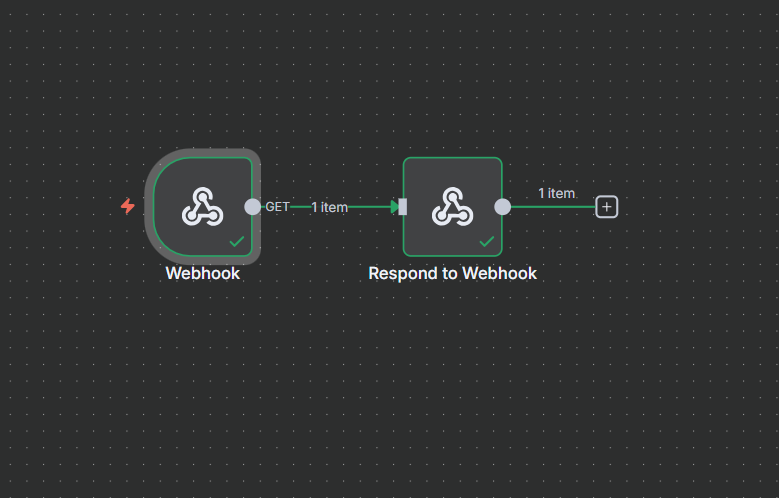
Two Webhook Nodes: Webhook Trigger vs Respond to Webhook
When you search “webhook” in n8n’s node panel, you’ll find two distinct nodes — don’t mix them up:
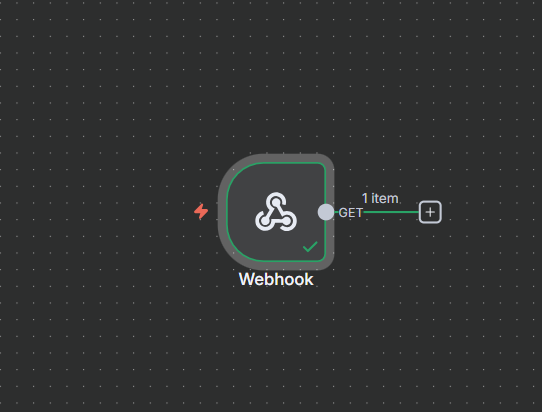
Webhook (the trigger — lightning bolt icon): This is what starts your workflow. It creates a URL that external apps can call. When the URL receives a request, the workflow begins. This node always goes first in your flow.
Respond to Webhook: This sends a response back to whoever called your webhook URL. Some platforms verify the webhook by sending a challenge token and expecting it echoed back. Slack does this. Monday.com does this. Without a proper response, those platforms will reject your webhook as invalid. This node sits at the end of your flow and handles that response.
Most workflows only need the Webhook trigger node. Add Respond to Webhook specifically when the sending platform’s documentation says it expects a response. When in doubt, check the docs of the app sending the webhook.

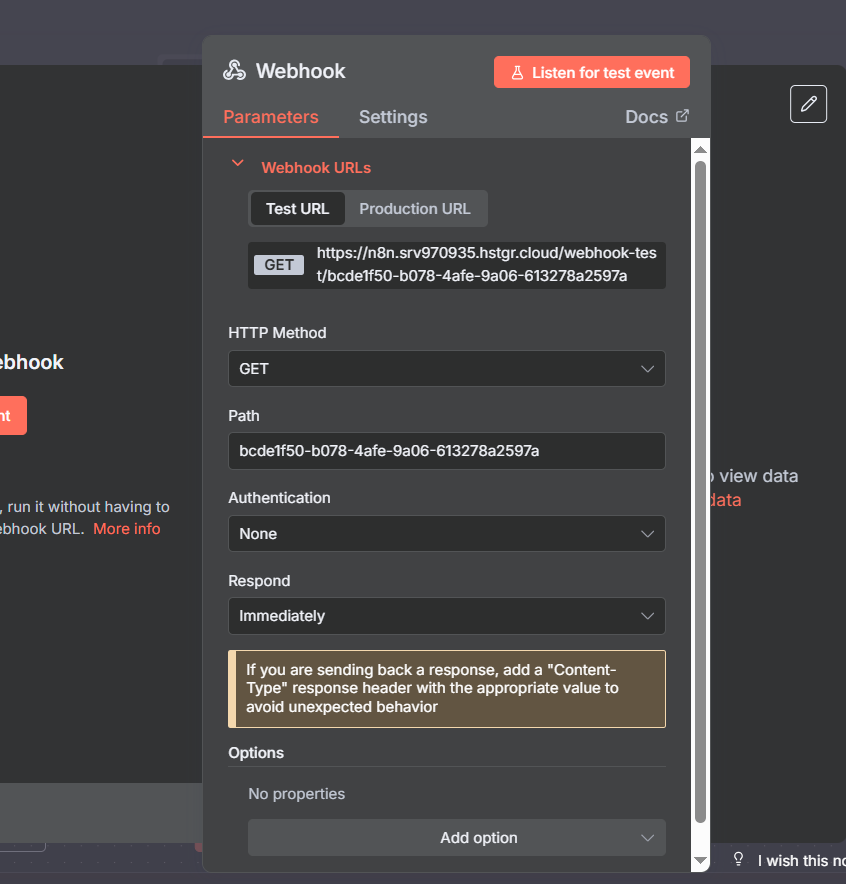
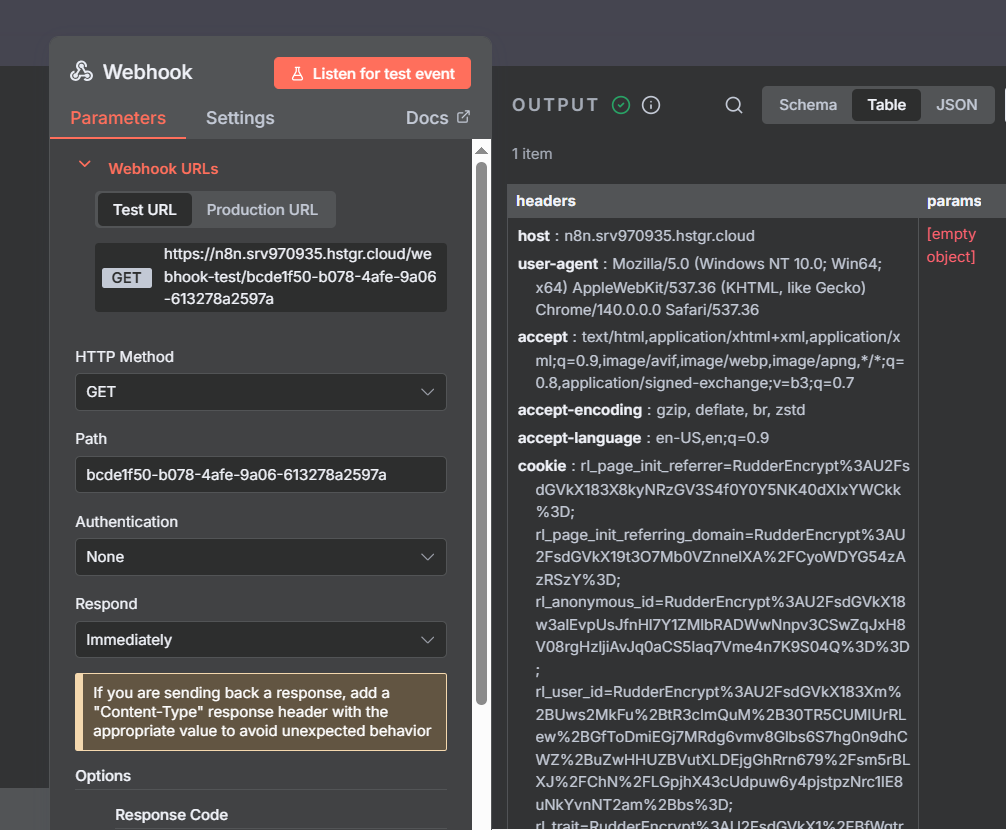
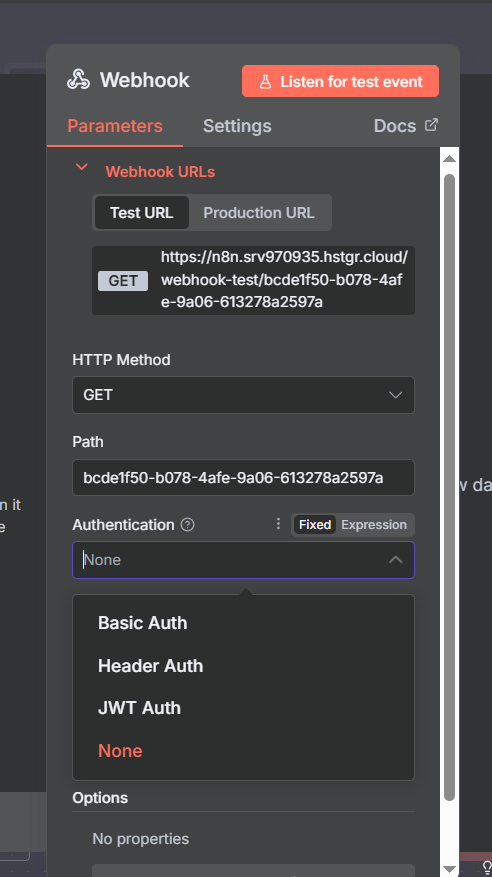
A First Look at the Webhook Node Settings
When you open the Webhook node, you’ll see several sections worth understanding upfront before diving into examples:
- Webhook URLs — test URL and production URL (different, both visible at the top)
- HTTP Method — GET, POST, PUT, PATCH, DELETE, HEAD
- Path — the unique identifier in the URL (UUID by default, customizable)
- Authentication — None, Basic Auth, Header Auth, or JWT
- Respond — when and how to send a response back
- Options — additional settings like Ignore Bots and IP Allowlist
We’ll walk through each of these in depth. Understanding the full settings surface before your first production webhook will save you debugging time later.
Test URL vs Production URL: The Most Critical Distinction
This single concept trips up more n8n beginners than anything else with webhooks. Every webhook node has two completely different URLs:
Test URL — includes /webhook-test/ in the path. This URL only responds when your workflow is inactive and you’ve clicked “Listen for Test Events” in the n8n editor. It’s for building and debugging.
Production URL — includes /webhook/ in the path (no “test”). This URL responds when your workflow is set to Active. It’s what goes into external apps for live use.
The path segment at the end is identical between both URLs — only the /webhook-test/ vs /webhook/ prefix differs. If your workflow is Active and you accidentally put the test URL in an external app, calls will fail silently. If you put the production URL in an app while building and your workflow isn’t Active, same problem.
Security critical: Every call to an active production webhook counts as an n8n execution (executions are what you’re billed on). If your production webhook URL leaks publicly — especially if it’s connected to an AI agent using OpenAI or another paid API — someone can trigger your workflow repeatedly and rack up API costs. Treat production webhook URLs like API keys: don’t commit them to version control, don’t paste them into Slack, and always add authentication before going live.
Customizing Your Webhook Path
By default, n8n generates a random UUID as your webhook path — something like /webhook/abc1234-5678-efgh-ijkl-9012mnop. You can replace this with anything you want.
Edit the Path field in the webhook node settings. Change it to hubspot-new-contact, monday-status-change, or stripe-payment-complete and both your test and production URLs update instantly. The path you set is the same for both.
A descriptive path makes logs easier to read, documentation easier to write, and debugging easier when multiple webhooks are active. It’s a small change that pays dividends at scale.
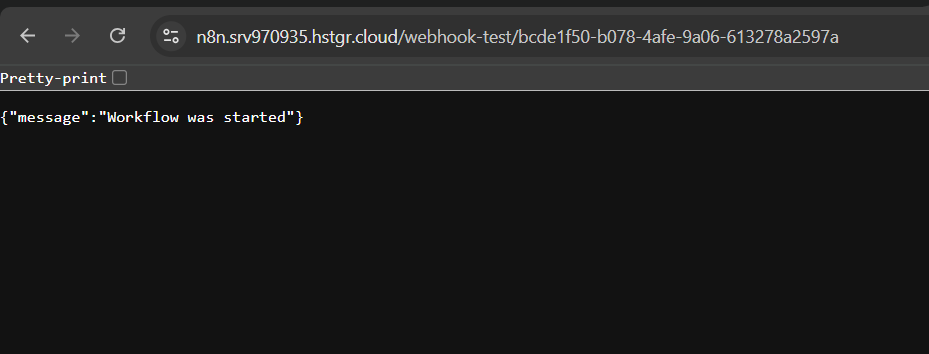
Below: testing the webhook by pasting the test URL directly into a browser. When the workflow starts, n8n shows “Workflow was started” and the data appears in the editor — here with just the URL and no additional payload.
Join Our AI Community
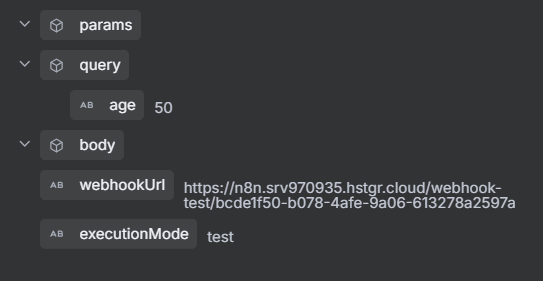
Sending Data via Query Parameters
The simplest way to pass data to your webhook is via query parameters — key-value pairs appended to the URL after a ? symbol. This works with GET requests and requires no special configuration in the webhook node.
Example URL with query parameters:
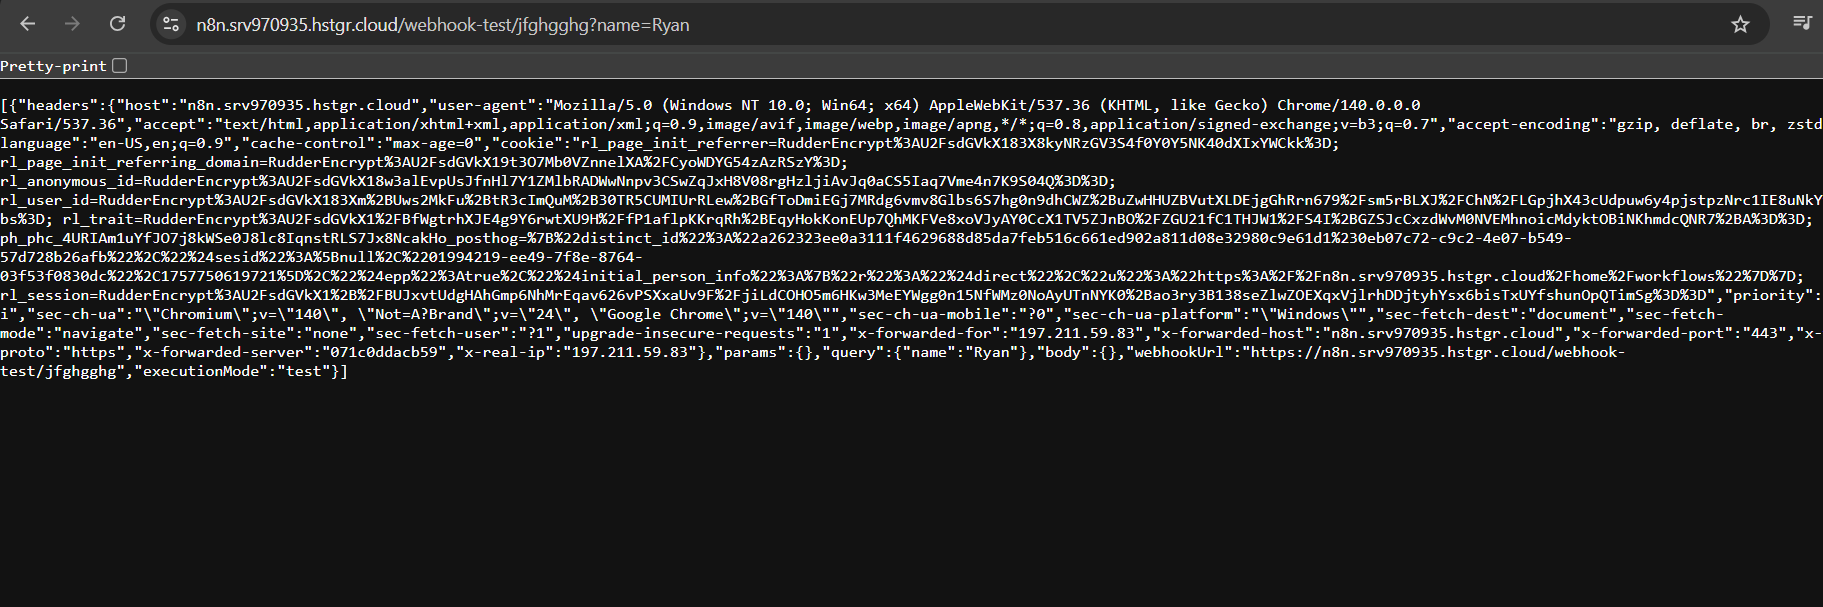
https://your-n8n.com/webhook-test/my-path?name=Ryan&video=n8n-webhooksn8n receives this and stores the values under the query object: query.name = "Ryan" and query.video = "n8n-webhooks". You can then reference these in any downstream node using {{ $json.query.name }}.
Multiple parameters are separated by &. There’s no limit on the number of parameters you can include, though URLs have a practical length limit of about 2,000 characters in most environments. For large payloads, use a POST request with a JSON body instead.

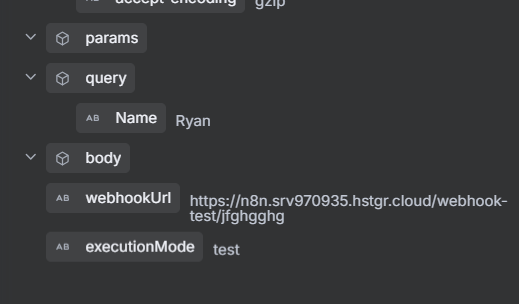
Path Variables: Defining Parameters Directly in the URL
A second approach is to define named variables directly in the path using the : prefix. You configure this in the Path field of the webhook node itself:
my-path/:miles_ran/:paceThen call the webhook with positional values:
https://your-n8n.com/webhook-test/my-path/20/6n8n receives these as params.miles_ran = "20" and params.pace = "6". The key difference from query parameters: these are positional and required — the URL structure is fixed. Query params are optional and can appear in any order.
Use path variables when you’re building a REST-style API endpoint where the resource identifier is part of the path. Use query parameters when you need flexible, optional filters.
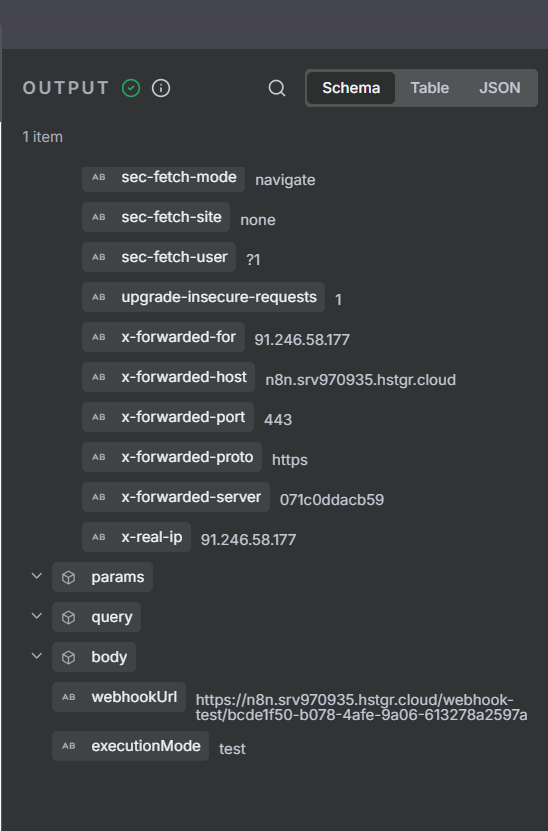
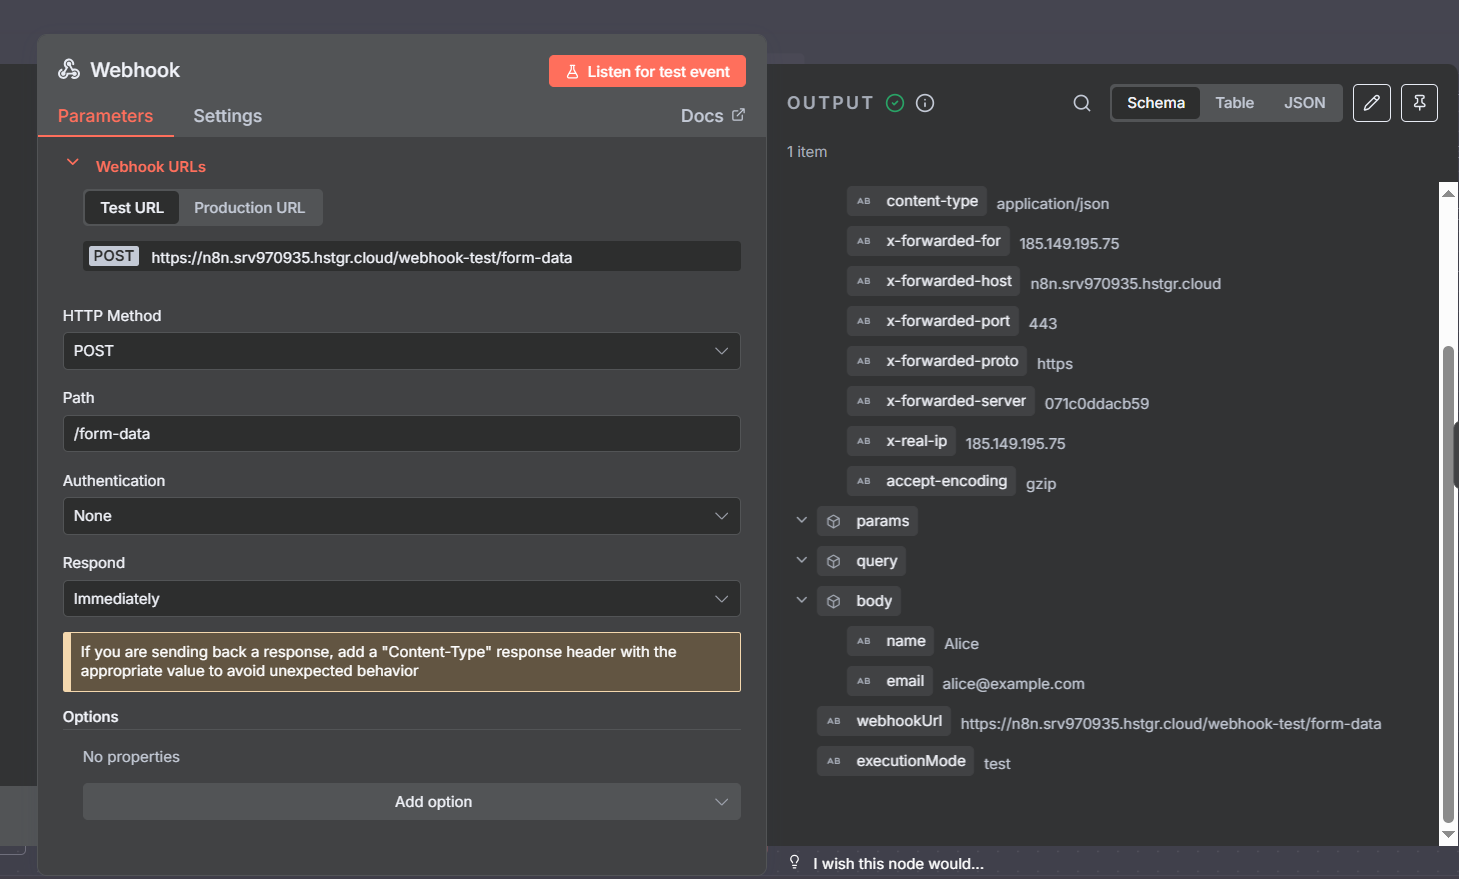
Reading Webhook Data: The Output Structure
Regardless of how data arrives at your webhook, n8n organizes it into a consistent output structure:
query— query string parameters from the URL (?key=value)params— path variables (/:variablestyle)body— POST request body (JSON, form data, raw text)headers— HTTP headers (Content-Type, Authorization, custom headers)webhookUrl— the URL that was calledexecutionMode— “test” or “production”
The Schema view in n8n’s output panel is the fastest way to explore incoming webhook data. It shows you the full structure in a tree view, making it easy to identify the exact path to each value. Switch from Table to Schema using the tabs at the top of the output panel.
Schema View: Navigating Complex Webhook Payloads
Real-world webhook payloads from platforms like Stripe, HubSpot, or Monday.com can be deeply nested JSON with dozens of fields. The Schema view lets you navigate this efficiently without reading raw JSON.
Click any field in Schema view to copy its path expression automatically. Use that path in downstream nodes to reference specific values: {{ $json.body.object.amount }}, {{ $json.query.contact_id }}, etc. This eliminates the guesswork of manually constructing field references for complex payloads.
Three Ways to Test Your Webhook
Browser paste is the simplest test method but only works for GET requests. Two more powerful approaches:
Postman: The most popular GUI tool for HTTP testing. Paste your test URL, select the method (GET, POST, etc.), add headers or a JSON body in the Body tab, and click Send. Postman lets you save requests, create collections, set environment variables, and chain requests — invaluable for iterating on webhook behavior during development. Postman is also the tool of choice for testing authentication setups, since you can easily toggle authorization headers on and off.
cURL: The command-line option. No installation required on most systems:
# Simple GET with query parameter
curl "https://your-n8n.com/webhook-test/my-path?distance=26.2"

# POST with JSON body
curl -X POST "https://your-n8n.com/webhook-test/my-path"   -H "Content-Type: application/json"   -d '{"name":"Ryan","event":"form_submit"}'

# GET with Basic Auth
curl -u "user:password" "https://your-n8n.com/webhook-test/my-path"
cURL in Action: Triggering a Workflow from the Command Line
cURL is fast, scriptable, and available everywhere. When you run a cURL command pointing at your test webhook URL, n8n responds with a JSON message confirming the workflow started. The data you sent appears immediately in the editor output, ready to inspect.
cURL becomes especially useful in CI/CD pipelines, shell scripts, and automated testing setups where you want to trigger an n8n webhook programmatically without a GUI. It’s also faster than Postman for quick smoke tests when you just need to confirm the webhook is reachable and the data arrives correctly.
Testing via a Full Terminal Session
When testing complex webhook scenarios, opening a full terminal session gives you the flexibility to run multiple cURL commands quickly, pipe outputs, chain tests, and keep a clean log of what was tested. Below is an example of a full terminal testing session — note how the n8n response is readable JSON confirming the workflow executed and showing the data that was received.

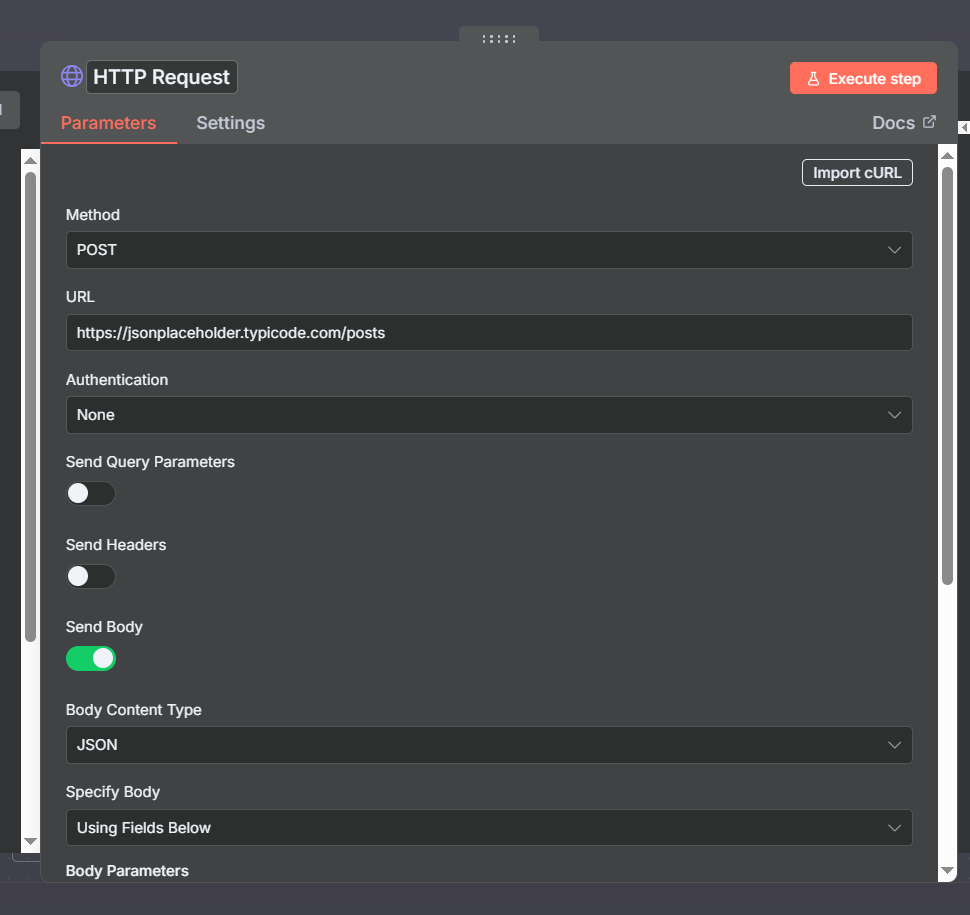
Calling a Webhook from Another n8n Workflow
You can also trigger one n8n webhook from inside another n8n workflow using the HTTP Request node. This creates an internal workflow-to-workflow communication pattern without needing any external tools:
- In Workflow B, add an HTTP Request node
- Set the method to GET (or POST if you need to send a body)
- Set the URL to the test or production webhook URL of Workflow A
- Execute Workflow B — it triggers Workflow A’s webhook
This is conceptually similar to calling a microservice API. Workflow A becomes a reusable function that any other workflow can invoke. However, for modular workflow design, n8n has a dedicated Execute Sub-workflow node that’s cleaner than the HTTP approach — we’ll cover that in the subworkflow section below. The HTTP approach is mainly useful when you want to test a webhook in isolation or integrate with a workflow you don’t control.
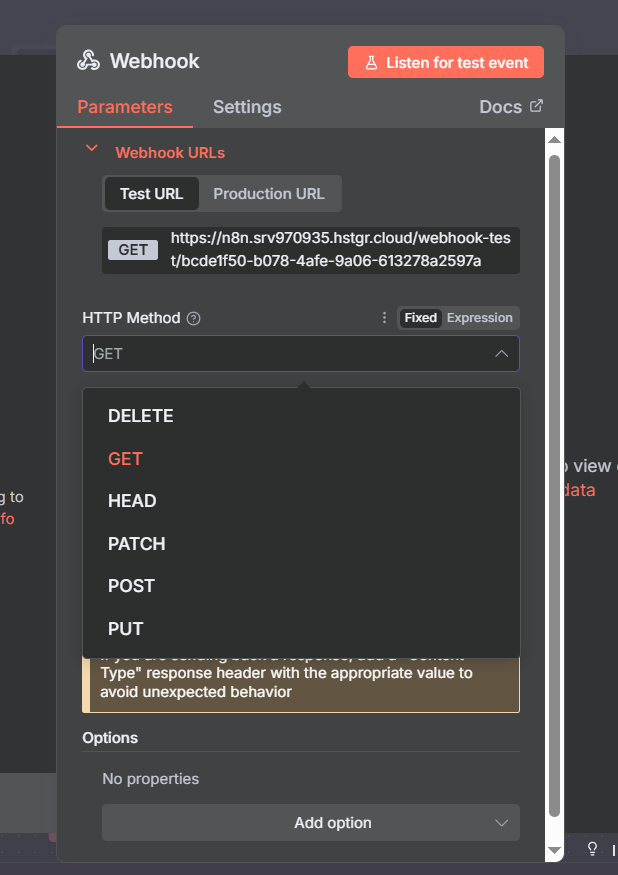
HTTP Methods: Matching What the Platform Sends
The HTTP Method setting tells n8n what type of requests your webhook accepts. Setting it incorrectly results in every call being rejected with a 405 Method Not Allowed error.
A clear mental model for the five common methods:
- GET — “Give me information.” Data arrives in the URL as query parameters. The request has no body. Use for simple event notifications where the URL itself carries all the context needed.
- POST — “Here’s new data to process.” Data arrives in a request body (usually JSON). The most common webhook method — used by Stripe, Monday.com, most form tools, and most custom applications. When a platform says “we send webhooks,” they almost always mean POST.
- PUT — “Replace this existing record.” Used when an update is meant to fully overwrite a resource.
- PATCH — “Update specific fields on this record.” Partial updates rather than full replacement.
- DELETE — “Something was deleted, handle it.” Used for deletion events in CRMs, databases, and task management tools.
Always check the sending platform’s webhook documentation. Monday.com explicitly requires POST. If you can’t find documentation for your platform, POST is the safest default.
Join Our AI Community
Authentication: Making Your Webhook Safe for Production
An unauthenticated webhook URL is a public endpoint anyone can call. In development that’s fine. In production, it’s a serious risk — especially if your workflow makes calls to paid APIs, writes to databases, or triggers any kind of irreversible action.
n8n offers three authentication modes for webhooks:
None: Default. No verification — any request from any IP is accepted. Fine for internal tooling on private networks; dangerous for anything public-facing.
Basic Auth: The caller must include a valid username and password in the Authorization header, encoded in base64. n8n checks this against the credentials you configure. Easy to set up, widely supported by third-party platforms that support webhook authentication, and simple to test in Postman using the Authorization tab.
Header Auth: The caller must include a specific header with a specific value. You define both the header name and the expected value in n8n credentials. Common pattern: the header is X-API-Key or Authorization, and the value is a secret token only you and the caller know. This is the standard API key pattern — easy to implement in custom apps and supported by most platforms that allow custom webhook headers.
JWT (JSON Web Token): The most advanced option. The caller signs a token with a shared secret, and n8n verifies the signature and any claims (expiry, audience, etc.) before allowing the request. Best for high-security workflows where you need tamper-proof authentication with expiry. JWT is worth its own video — for most webhook use cases, Basic Auth or Header Auth is sufficient.
Practical rule: set up authentication as one of your last steps before activating a workflow. It adds friction during development and you’ll constantly be toggling it. Get the workflow logic right first, then lock it down.
Testing Basic Auth in Postman
To verify your Basic Auth setup works, Postman makes it easy. After configuring Basic Auth credentials in n8n:
- In Postman, go to the Authorization tab for your request
- Select “Basic Auth” from the type dropdown
- Enter the username and password you set in n8n
- Click Send — if credentials match, you get “Workflow was started”
- Remove the credentials and send again — you should get “Authorization is required”
That second test (without auth) is important — it confirms the webhook is actually rejecting unauthorized requests, not just accepting everything. Don’t skip this validation step before going to production.
For Header Auth, use Postman’s Headers tab. Add your custom header name and value, then test with and without it to confirm the security is working.
Header Auth and JWT: Advanced Authentication Options
Header Auth is often cleaner than Basic Auth for machine-to-machine webhook scenarios. Instead of encoding a username/password, you simply include a pre-shared token in a specific header. Your n8n credential specifies both the header name and the expected value.
For example, you might configure: header name X-Webhook-Secret, value my-secret-token-here. Any request that doesn’t include exactly this header with exactly this value gets rejected.
This approach scales well when you need to rotate credentials — you update the value in one place (n8n credentials) and the token in the sending system, with no URL changes needed. It’s also the authentication method most well-documented in platform developer guides.
JWT is worth mentioning even if the setup is beyond this guide’s scope. JSON Web Tokens allow the caller to include verifiable claims — who they are, when the token was issued, when it expires, what they’re allowed to do. This means your webhook can verify not just “is this caller authorized?” but “is this token still valid and was it issued for this specific operation?” For sensitive financial or healthcare workflows, JWT is the right call.
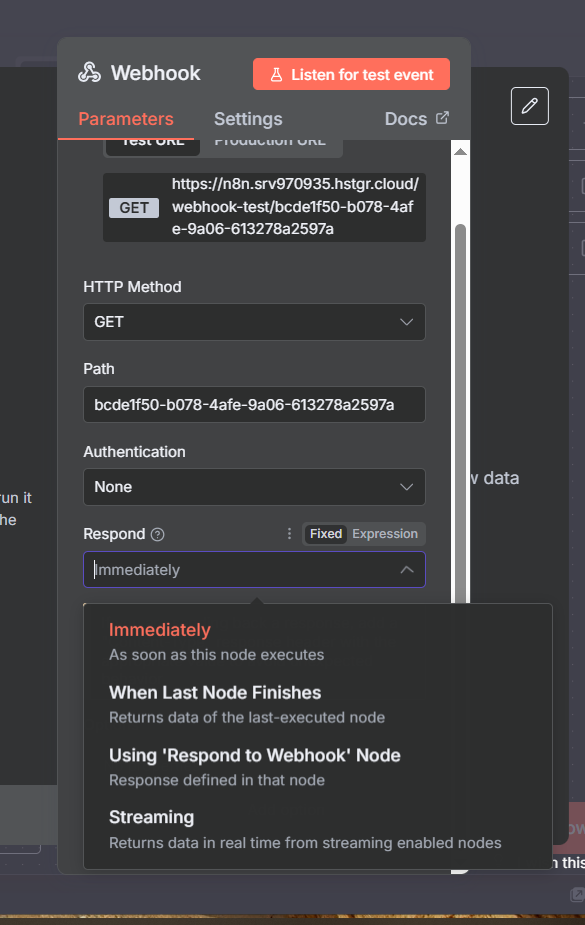
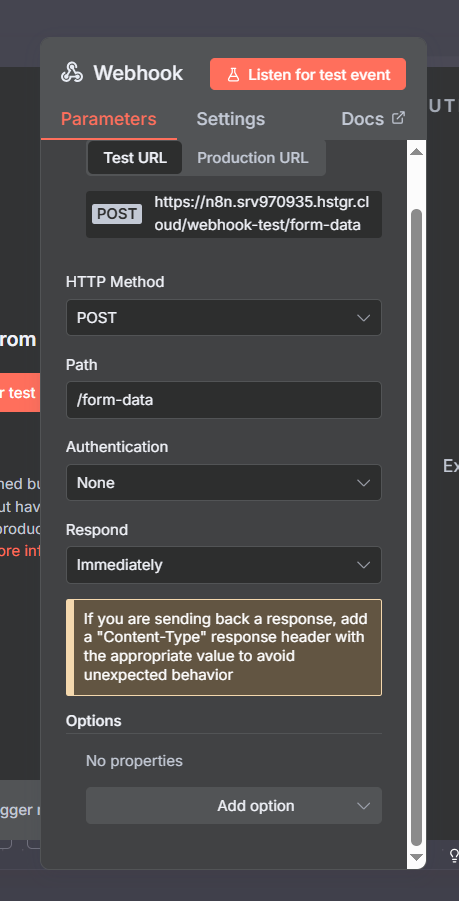
Webhook Response Options
The Respond setting controls when n8n sends an HTTP response back to the caller. This matters more than it seems — some platforms will timeout or retry if they don’t receive a response within a few seconds:
Immediately: n8n sends the response the instant the webhook node executes, before any downstream nodes run. The caller gets a fast acknowledgment (HTTP 200) and n8n continues processing in the background. Best for: fire-and-forget events like “new form submission” or “task completed” where the caller just needs confirmation of receipt and doesn’t need results.
When last node finishes: n8n waits for the entire workflow to complete before sending a response. The caller receives the final output of your workflow. Use this when you’re building webhook-based APIs where the caller expects a meaningful result from your processing — for example, a form that validates data and returns a structured confirmation.
Using the Respond to Webhook node: Full manual control. You decide exactly when to respond, what data to include in the response body, what status code to return, and what headers to set. Required when the platform expects a specific response format. The most powerful and most flexible option.
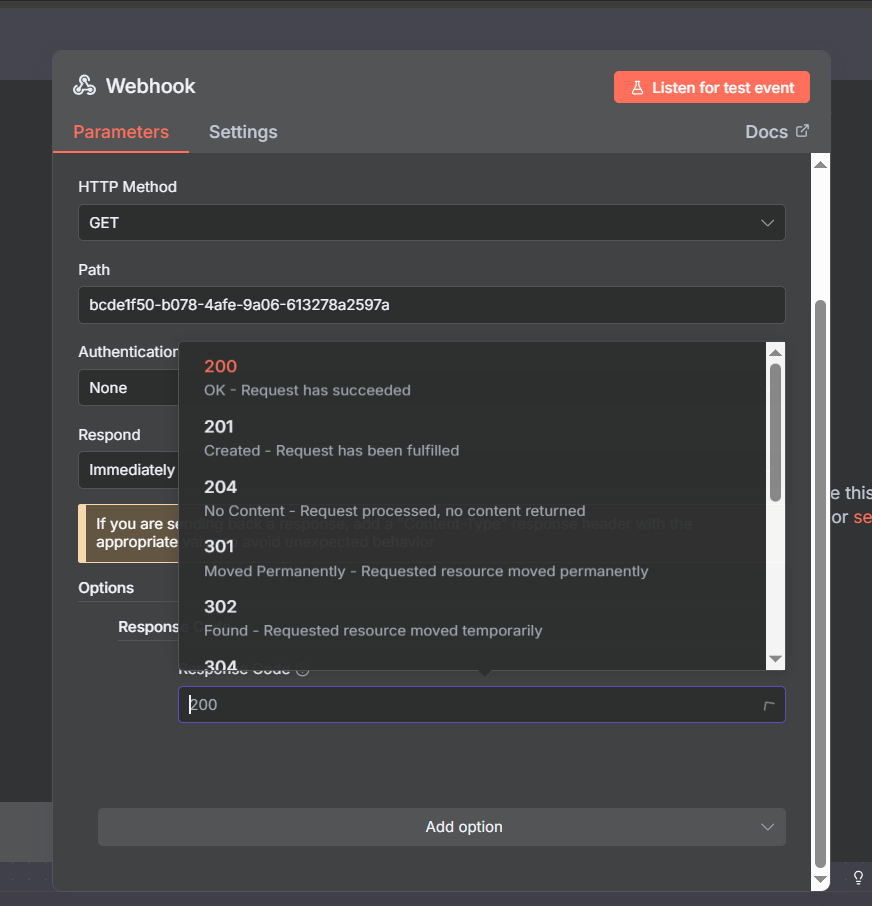
Customizing HTTP Response Codes
The Response Code option (under Options → Add Option) lets you specify the HTTP status code returned by your webhook. By default n8n returns 200 OK. When should you change this?
- 201 Created: When your workflow creates a new resource in response to the webhook call — appropriate for webhook-based APIs
- 202 Accepted: Explicitly signals “I received your request and will process it asynchronously” — use this with the Immediately respond setting to make the async nature explicit
- 400 Bad Request: When incoming data fails validation — signals to the caller they sent malformed data
- 401 Unauthorized: When auth fails (n8n handles this automatically for its built-in auth types)
- 422 Unprocessable Entity: Data format was valid but semantically incorrect
- 500 Internal Server Error: When your workflow hits an unexpected error
For most webhook consumers (external platforms sending events to n8n), they only care that you return something in the 2xx range. The nuanced status codes matter more when you’re building webhook-based APIs where the caller is your own code and acts differently based on the response code.
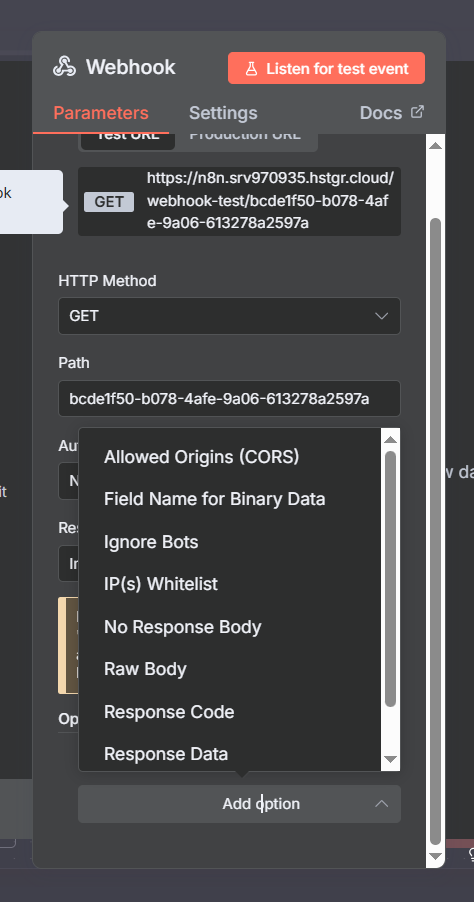
Additional Options: Ignore Bots and IP Allowlist
Two underused settings worth enabling for production webhooks:
Ignore Bots: Filters out requests from web crawlers, link previewers, and other automated bots that might stumble across or probe your webhook URL. Without this, security scanners and SEO tools that crawl the web can occasionally trigger your webhook. Enabling Ignore Bots prevents those spurious executions from consuming your execution quota or corrupting your data. Recommended on for all production webhooks.
IP Allowlist: Accepts only requests from specific IP addresses or CIDR ranges. If you know the sending platform’s IP addresses (Stripe publishes theirs, for example), this is one of the strongest security measures available — it means your webhook simply won’t respond to requests from any other IP, regardless of whether they have the right credentials. Check the platform’s documentation for their outbound webhook IP ranges.
Join Our AI Community
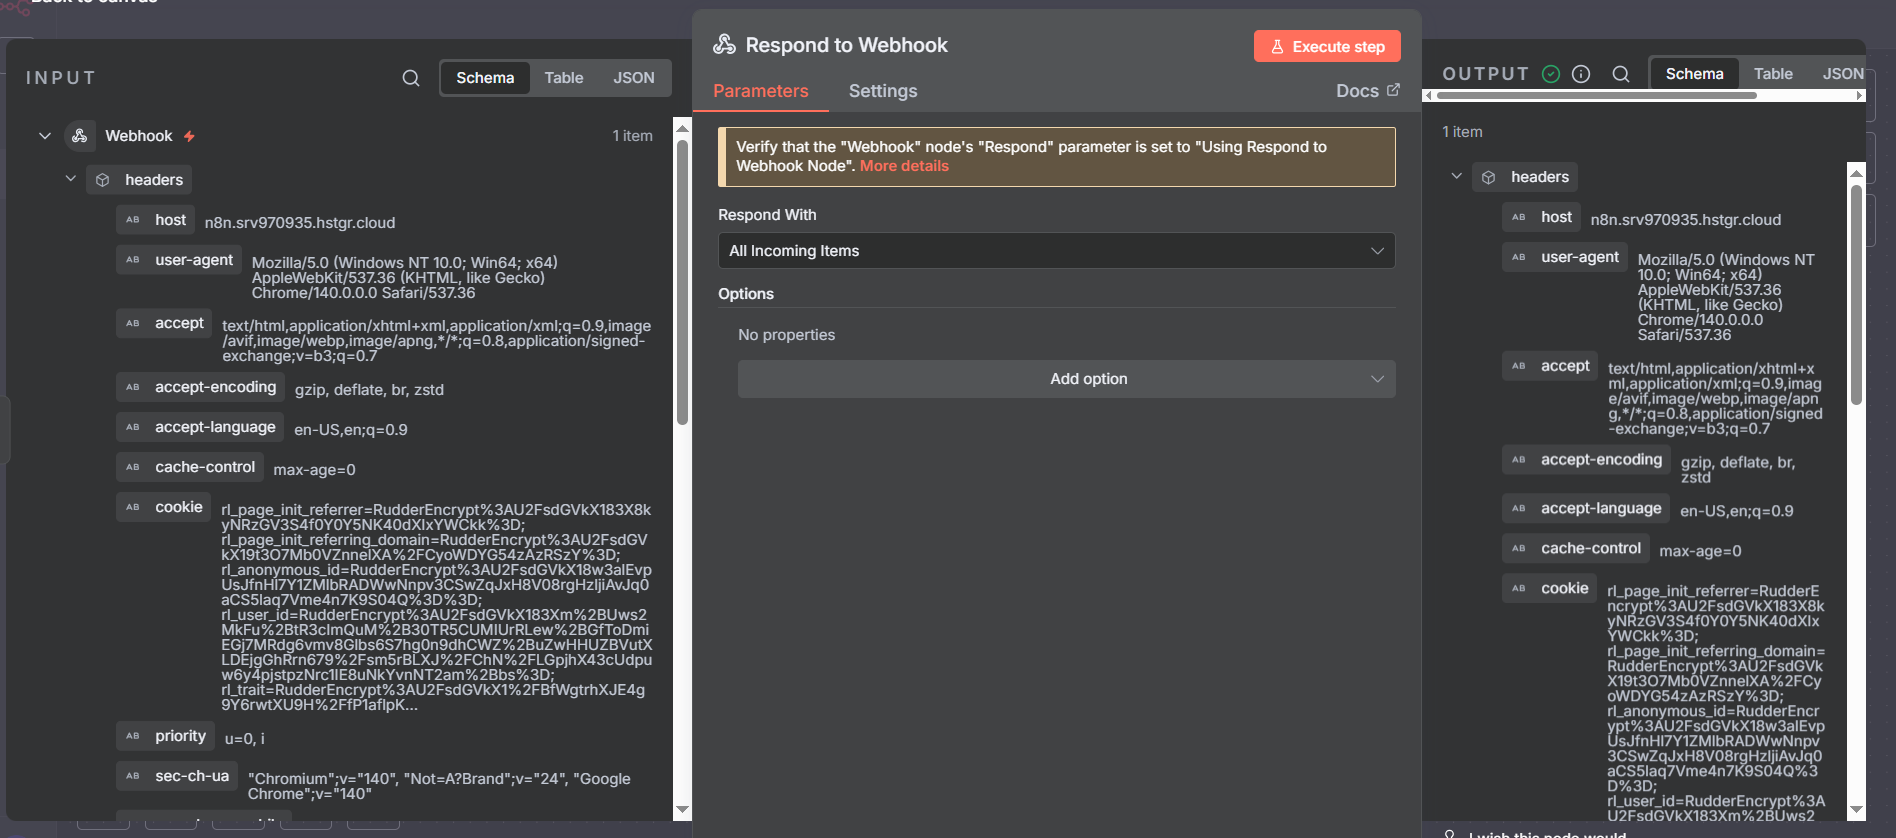
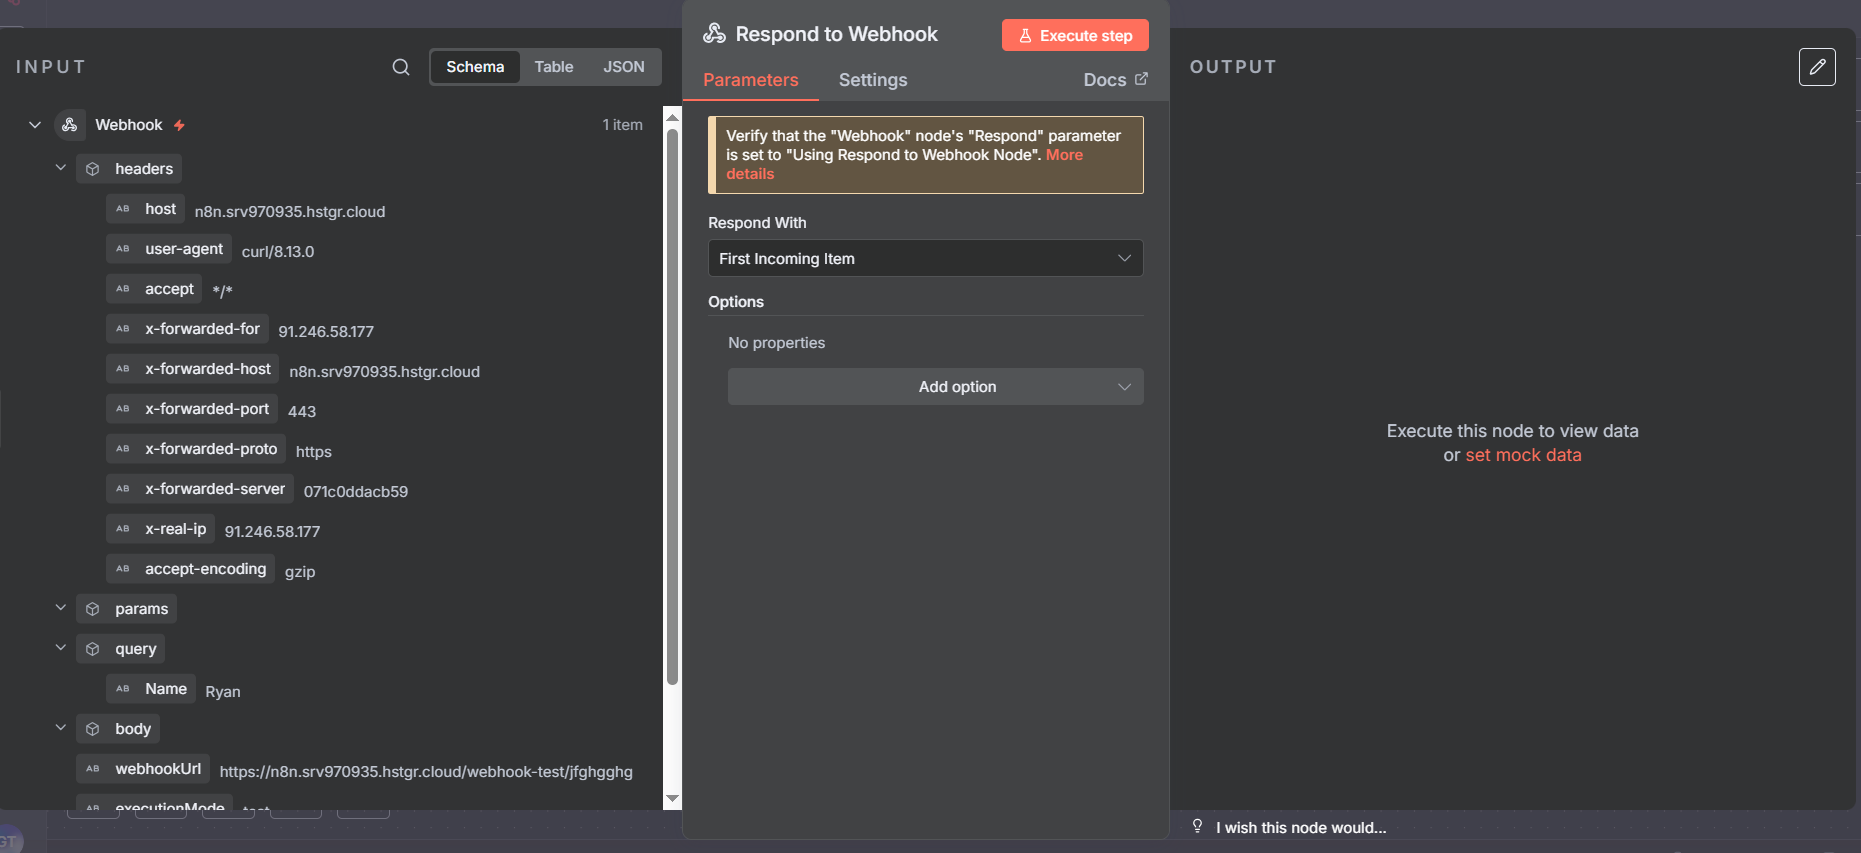
The Respond to Webhook Node: Challenge Tokens and Custom Responses
Some platforms verify your webhook URL before they’ll send live events to it. The verification process typically works like this: the platform sends a POST request to your webhook URL containing a randomly generated challenge token. Your webhook must respond with that same token in the response body — within a few seconds. If you respond correctly, the platform marks your webhook as verified and starts sending real events.
Monday.com uses this pattern. Slack uses it. Some custom webhook providers use it. The good news: n8n’s Respond to Webhook node makes this straightforward to implement.
Setup: in your Webhook node, set Respond to “Using Respond to Webhook Node”. Then add a Respond to Webhook node at the end of your flow. In the Response Body, echo back the challenge:
{{ JSON.stringify({ "challenge": $json.body.challenge }) }}When the platform sends its verification request, your webhook receives the challenge in body.challenge, the Respond to Webhook node sends it back, the platform verifies, and your webhook is active. From that point on, the same workflow handles real events with whatever logic you build after the webhook trigger.
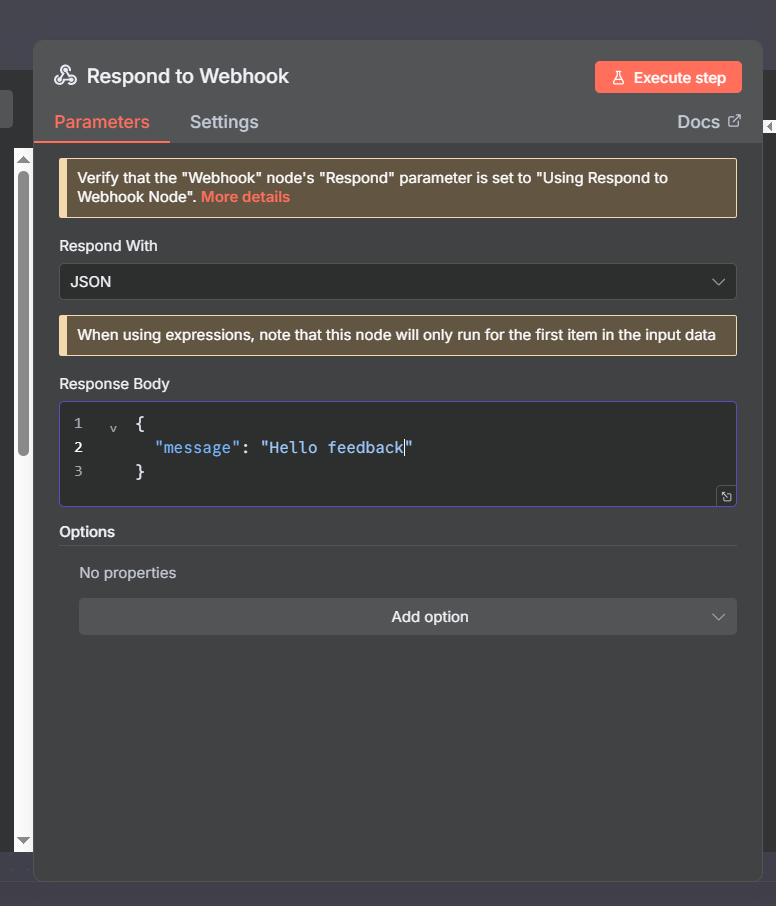
Custom Response Body: Returning Data to the Caller
The Respond to Webhook node isn’t just for challenge tokens — it’s for any case where you want to return structured data back to the caller. This is the mechanism that turns n8n workflows into functional HTTP APIs.
Configure the response body as JSON and reference any data from your workflow:
{
  "status": "success",
  "processed": {{ $json.contact_count }},
  "workflow_id": "{{ $workflow.id }}",
  "timestamp": "{{ $now }}"
}
You can also set custom response headers — useful for setting Content-Type, CORS headers, or custom metadata headers. And you can conditionally respond with different status codes based on workflow outcomes, using an IF node before the Respond to Webhook node to route success and error cases to different response configurations.
Verify the Response Works End-to-End
After setting up the Respond to Webhook node, always verify the full round-trip works before going live. In Postman (or cURL), make a request to your webhook and inspect the response — not just the n8n editor output. The response body, status code, and headers should all match what you configured.
This is also where the n8n Executions panel becomes valuable: you can see both what n8n received and what it sent back, making it easy to confirm the challenge token or response body was correct.
Join Our AI Community
Checking Executions: Your Debugging Home Base
Every webhook call that triggers your workflow creates an execution record. Navigate to Executions in the n8n sidebar to see all of them. Each execution shows:
- Whether it was a test execution (magnifying glass icon) or a production execution
- When it ran and how long it took
- Whether it succeeded or failed
- The full input and output at every node
The most powerful debugging feature: Copy to Editor. Click any execution entry and select this option. n8n loads the exact data from that execution back into the workflow editor — you can then re-run individual nodes against that real data without needing to trigger the webhook again. This is how you debug a webhook that only misbehaves with certain specific payloads: find the failing execution, copy it to editor, and step through node by node.
For high-traffic webhooks, executions can accumulate quickly. n8n lets you filter by success/failure and by workflow, and you can configure execution data retention in n8n settings.
Logging Webhook Data: Build a Permanent Audit Trail
For production webhooks — especially those processing business-critical events — logging key information about every call is worth the small extra effort. A good webhook log tells you: what was received, when, from where, and what happened as a result.
Recommended fields to log for every webhook call:
executionId— unique identifier for that specific workflow runtimestamp— when the webhook was calledwebhookUrl— which webhook received the callexecutionMode— test vs productionip— the calling IP addressbody— the full request body (or a hash/summary of it for large payloads)query— any query parameterswebhookResponse— what you sent back
Where to log: n8n’s native Data Table node requires no external setup and is instantly queryable from within n8n. Google Sheets works well for sharing logs with non-technical teammates. Airtable provides a nice UI for browsing logs. For high-volume production systems, a proper database (Postgres, MySQL, etc.) is the right choice.
Add the logging node right after the webhook trigger, before any other processing. That way, even if downstream nodes fail, you have a record that the webhook was received.
The Subworkflow Pattern: The Right Architecture for Production Webhooks
As webhook-triggered workflows grow more complex, a single monolithic workflow becomes hard to maintain, test, and reuse. The recommended pattern for production: split responsibilities across two workflows.
Workflow A — The Receiver: Stays lean. Its only jobs are:
- Receive the incoming request
- Validate it (check for required fields, verify a signature if applicable)
- Log the incoming data
- Handle the challenge token response if needed
- Call Workflow B via Execute Sub-workflow
Workflow B — The Logic: Contains all your actual business logic — API calls, data transformation, database writes, notifications, error handling. This workflow can be tested independently using the n8n editor without ever triggering a real webhook.
To connect them: add an Execute Sub-workflow node (search “execute subworkflow” in the node panel). Select the target workflow ID. Data flows from A to B automatically. If Workflow B fails, Workflow A can be configured to catch that error and return an appropriate HTTP response to the caller.
Benefits: Workflow B becomes reusable — any workflow can call it, not just your webhook receiver. You can update the business logic without touching the webhook receiver. You can test and iterate on Workflow B in isolation. And you get a cleaner separation between “network boundary” concerns (auth, logging, validation) and “business logic” concerns.
Subworkflow Pattern in Practice
Here’s what the full two-workflow pattern looks like end-to-end. Workflow A (the receiver) is intentionally minimal — five or six nodes at most. Workflow B can be as complex as needed without affecting the receiver’s performance or reliability.
The Execute Sub-workflow node in Workflow A passes the full data context from the webhook payload into Workflow B. In Workflow B, you can access any field from the original webhook using standard n8n expressions — nothing special is needed to bridge the data between workflows.
For complex systems with multiple event types (e.g., a webhook from Monday.com that handles task-created, task-updated, and task-deleted events), you can use an IF or Switch node in Workflow A to route different event types to different sub-workflows, each optimized for that specific event type.
Production Webhook Setup Checklist
Before marking any webhook as production-ready, run through this checklist:
- Readable path — replace the UUID with a descriptive name
- Correct HTTP method — verified against the sending platform’s documentation
- Tested with Postman or cURL — not just browser paste
- Authentication configured — Basic Auth or Header Auth minimum; JWT for sensitive flows
- Authentication tested both ways — confirmed it rejects unauthorized requests too
- Ignore Bots enabled — prevents spurious executions from crawlers
- IP Allowlist set — if the sending platform publishes its IP ranges
- Response configured correctly — challenge token handled if required by platform
- Response code appropriate — not just default 200 if the caller cares
- Logging added — incoming data persisted before any processing
- Error handling added — downstream failures don’t leave the caller hanging
- Logic moved to subworkflow — receiver stays lean
- Switched to production URL — workflow set to Active, production URL in the sending app
- End-to-end test with production URL — one final verification before going fully live
Join Our AI Community
Frequently Asked Questions
Why is my webhook not receiving data when the workflow is active?
You’re almost certainly using the test URL instead of the production URL. When the workflow is Active, only the production URL (/webhook/your-path) works — the test URL (/webhook-test/your-path) only responds during development with the workflow inactive. Update the URL in the sending platform and test again.
How do I receive JSON body data in a webhook?
Set your webhook to HTTP method POST and ensure the sending app includes a Content-Type: application/json header. n8n automatically parses the JSON body and makes it available under $json.body. To test this with cURL: curl -X POST -H "Content-Type: application/json" -d '{"key":"value"}' https://your-webhook-url
What’s the difference between Basic Auth and Header Auth for webhooks?
Basic Auth encodes a username and password into the standard HTTP Authorization header. Header Auth uses a completely custom header name and value of your choosing. Header Auth is more flexible for custom apps (you can name the header anything and rotate the value without changing the header name). Basic Auth is more standardized and supported by more third-party platforms. Both are equally secure in practice when used over HTTPS.
Monday.com says my webhook URL is invalid — what’s wrong?
Monday.com sends a challenge token verification request when you first register a webhook URL. Your n8n workflow must use the Respond to Webhook node to echo back the challenge: {{ JSON.stringify({ "challenge": $json.body.challenge }) }}. Without this, Monday.com rejects the URL. Make sure the Webhook node’s Respond setting is set to “Using Respond to Webhook Node” and that the workflow is Active when you register the URL in Monday.com.
Do test executions count against my n8n execution quota?
No — test executions (via the test URL with the workflow inactive) do not count against your quota. Only production executions (via the production URL with the workflow Active) consume executions. This means you can iterate and test as much as you need during development without impacting your billing.
How do I trigger an n8n workflow from another n8n workflow?
The cleanest method is the Execute Sub-workflow node — search for it in the node panel. This directly calls another workflow without any HTTP overhead and keeps everything internal to n8n. You can also use an HTTP Request node pointing at a webhook URL, but Execute Sub-workflow is preferred for workflow-to-workflow communication within the same n8n instance.
Next Steps
Webhooks are the real-time trigger layer of n8n automation. Pair them with these nodes to build complete production workflows:
- n8n HTTP Request Node — the outbound counterpart to webhooks; call external APIs from inside your workflows
- n8n HubSpot Integration — a real-world example of building webhook-triggered CRM automations
- n8n Loop Over Items — process webhook payloads containing arrays or multiple records efficiently
- n8n Code Node — transform, validate, and reshape webhook payload data with JavaScript or Python
- n8n Aggregate Node — combine multiple webhook-triggered results back into a single payload
The most important habits to build with webhooks: always test authentication properly (both accepting valid and rejecting invalid requests), always use the production URL when activating, and always add logging before any processing so you have a record of every call regardless of downstream failures. Get these right and you’ll have rock-solid event-driven automation.
