How to Scrape Google Search Results with n8n and Apify for B2B Lead Generation
What if your sales team could automatically pull every business ranking for a given search term, classify each one by business type using AI, and have a clean, prioritized lead list waiting in Google Sheets — all without touching a browser?
That’s exactly what this n8n workflow does. You enter a search term like “building supply wholesaler Virginia,” the workflow scrapes the Google search results using an Apify actor, extracts each organic result’s title, URL, and meta description, classifies the business type using GPT-4o mini, and writes everything to a Google Sheet. The result is a structured, AI-enriched SERP dataset ready for your sales team to work through.
This workflow is especially powerful for local B2B lead generation — searching for specific business types in specific locations and capturing the businesses that Google already ranks for those queries. It’s also useful for competitive research, market mapping, and content gap analysis.
Workflow Overview
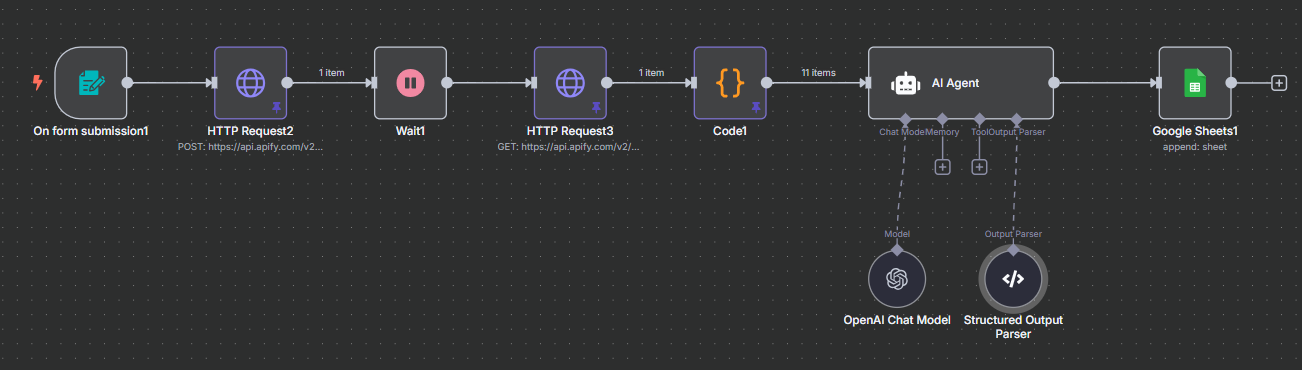
The complete pipeline runs through six stages from search term entry to enriched Google Sheet row:
- Form Trigger — enter a search term to research
- Apify HTTP Request (POST) — launch the Google Search Results Scraper actor with your query
- Wait Node — pause 20 seconds while Apify processes the search
- Apify HTTP Request (GET) — retrieve the scraped SERP results
- Python Code Node — parse the organic results into individual items (title, URL, meta description)
- AI Agent + Structured Output Parser — classify each result’s business type using GPT-4o mini
- Google Sheets Append Row — write the enriched record to your lead sheet
The output Google Sheet has columns for: search term, page title, website URL, meta description, and AI-generated business type classification. This gives your sales team everything they need to quickly evaluate each result without ever leaving the spreadsheet.
Note on Apify integration: This workflow was originally built using HTTP Request nodes to call Apify’s REST API directly — the approach that was standard before Apify released their native n8n community node. We cover both approaches below so you can choose the one that fits your setup.

Step 1: Form Trigger and Launching the Apify Actor
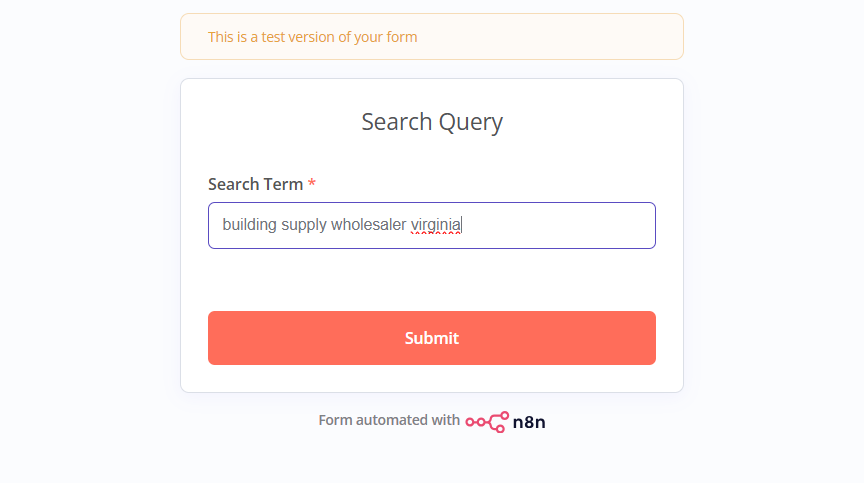
The workflow starts with a Form Trigger node containing a single text field: “Search Term.” The user types in their query (e.g., building supply wholesaler Virginia) and submits — the rest runs automatically.
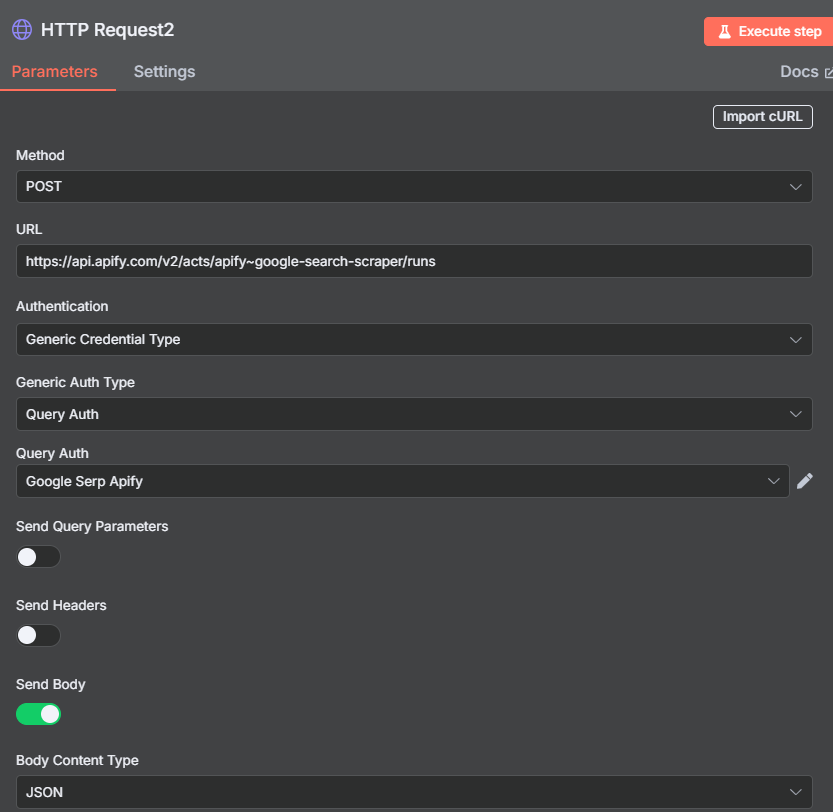
The search term flows into the first Apify node, which launches the Google Search Results Scraper actor. There are two ways to integrate Apify here:
Option A — Native Apify Node (recommended): Install the @apify/n8n-nodes-apify community node and use the “Run Actor and Get Dataset” operation. This is cleaner, requires no manual HTTP configuration, and handles authentication through a saved credential. Set the input JSON to {"query": "{{ $json.searchTerm }}", "resultsPerPage": 10}.
Option B — HTTP Request (original approach): Send a POST request to Apify’s run-actor endpoint. Set up a Generic Credential with query authentication, name the parameter token, and paste your Apify API token as the value. The request body is the same JSON. You can get the endpoint URL from your Apify account under Settings → API & Integrations → API Endpoints → Run Actor.
The resultsPerPage parameter accepts values up to 100. For business prospecting, 10 results is usually too few — consider 30–50 to get a meaningful pool of leads per search. You can even expose this as a second form field so users can choose how many results to pull.
Advanced Actor Configuration Options
The Google Search Results Scraper offers a range of advanced filters beyond the basic query and result count. These can be added to your input JSON to refine what gets scraped:
- countryCode: Restrict results to a specific country (e.g.,
"us","gb"). Important for local lead generation — without this, results may mix international sites. - languageCode: Filter results by language, useful when searching multilingual markets.
- mobileResults: Set to
trueto simulate a mobile search and get mobile-ranked results instead of desktop. - includeUnfilteredResults: Sometimes Google filters duplicate or low-quality results; set this to
trueto get the unfiltered list.
For most B2B prospecting use cases, the defaults work well. The key lever to adjust is resultsPerPage — bump this to 30 or 50 for richer lead lists, especially for competitive industries where you want to see beyond the first page of results.
Steps 3 & 4: Wait Node and Retrieving the Results
After launching the Apify actor, add a Wait node set to 20 seconds. This pause gives Apify time to complete the Google search scrape before you attempt to retrieve the results. Most SERP scrapes complete within 10–15 seconds, so 20 seconds provides a comfortable buffer.
If you’re using the native Apify n8n node with “Run Actor and Get Dataset” in one combined operation, you can skip the Wait and the GET request entirely — the node waits for completion automatically. This is one of the main advantages of the native node over the HTTP Request approach.
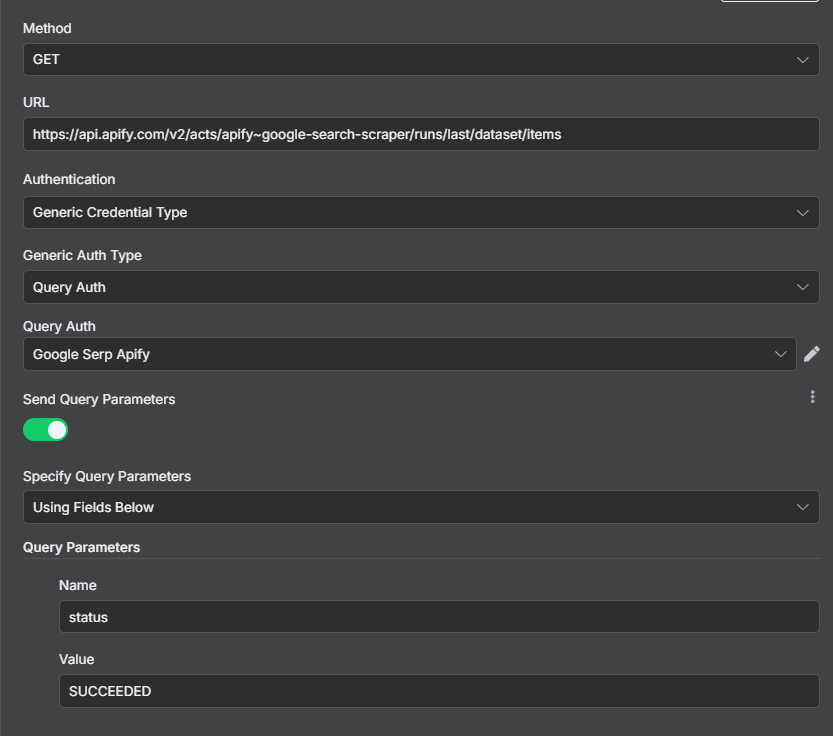
For the HTTP Request approach: after the Wait, add a second HTTP Request node set to GET and paste in the dataset retrieval endpoint from Apify. Use the same credential. The response contains the full JSON output of the actor run, including all scraped SERP data.
The raw output includes the search query, organic results (numbered 0–9 by default), paid ads if present, related queries, and “People also ask” questions. For lead generation, we only care about the organicResults array — this is where the business listings live.
Understanding the SERP Data Structure
Each item in the organicResults array represents one Google search result and contains:
- title — the page title shown in the search result
- url — the full URL of the result
- description — the meta description (the two-line snippet shown under the title in Google)
- position — the ranking position (1 = top organic result)
- domain — the root domain of the result
The meta description is particularly valuable for AI classification — it often contains explicit business type information like “wholesale supplier,” “manufacturer,” “distributor,” or “contractor.” Combined with the page title and URL, this gives the AI model enough context to accurately classify most businesses without needing to visit the actual website.
For the 10-result default, you’ll get items at positions 0–9. For larger scrapes (30–100 results), the data structure is the same — just more items in the array.
Step 5: Python Code Node — Parsing Organic Results
The raw API response wraps the organic results in a nested structure. Add a Code node (set to Python mode) to extract and flatten them into individual n8n items — one item per search result:
search_term = items[0]['json']['searchQuery']['term']
organic = items[0]['json']['organicResults']

return [
  {
    "json": {
      "title": r.get("title", ""),
      "url": r.get("url", ""),
      "description": r.get("description", ""),
      "searchTerm": search_term
    }
  }
  for r in organic
]
This Python list comprehension loops through each organic result and produces one output item per result — so a 10-result search produces 10 items, a 30-result search produces 30 items, and so on. Each item carries the title, URL, meta description, and the original search term (so your Google Sheet can show which query each lead came from when you run multiple searches).
If you prefer JavaScript, the equivalent code works fine — use $input.all()[0].json.organicResults.map(r => ({...})). Python is used here because of the author’s familiarity, but both languages are equally capable for this task.
Step 6: AI Agent — Classifying Business Types
Each organic result item flows into an AI Agent node that classifies the business type using a single, focused prompt. The agent receives the title, URL, meta description, and search term for each result and returns a 1–5 word classification of what the business does.
The system prompt for the agent:
“Based on the title, URL, description, and search term provided, write a 1–5 word classification of the business type. If you can identify the business from its URL or brand name, use that. Otherwise, use the description and search term context to make your best determination.”
Connect GPT-4o mini as the model — it’s inexpensive and more than capable for this classification task. At roughly $0.15 per million input tokens, classifying 50 search results costs a fraction of a cent.
After the AI Agent, add a Structured Output Parser to ensure the results come back as clean JSON. Configure it by providing an example of the output structure you expect:
{
  "title": "Example Company Name",
  "url": "https://example.com",
  "description": "Meta description text",
  "searchTerm": "building supply wholesaler Virginia",
  "businessClassification": "Building Materials Wholesaler"
}
The Structured Output Parser tells the AI to return exactly this JSON shape — making it trivial to map fields into Google Sheets without any additional transformation.
Step 7: Writing to Google Sheets
The final node is a Google Sheets Append Row that writes each classified lead to your spreadsheet. Set the operation to Append Row and map these fields to your column headers:
- Search Term →
{{ $json.searchTerm }} - Title →
{{ $json.title }} - Website →
{{ $json.url }} - Meta Description →
{{ $json.description }} - Business Type →
{{ $json.businessClassification }}
Use plain Append Row — not “Append or Update.” Every run adds new records from potentially different search terms, so there’s no row to match or update.
The beauty of including the search term as a column is that you can run the workflow 20 or 30 times with different queries and accumulate all your leads in a single master sheet. Your sales team can then filter by search term, sort by business type, and work through the list systematically.
Optional enhancement: add a “Date Scraped” column using {{ $now.toISO() }} so your team knows how fresh each lead is. SERP rankings change over time, and leads scraped six months ago may no longer be accurate.
Use Cases for Google SERP Lead Generation
Local B2B prospecting: The primary use case. Search for “[business type] [city/region]” to find every business Google considers relevant for that query in that location. For a company selling industrial equipment, searches like “manufacturing plants Chicago” or “metal fabrication shops Texas” surface businesses that would be hard to find through any other method.
Competitor mapping: Search for terms your competitors rank for. The results tell you who else is competing for that SERP real estate — useful intelligence for positioning and go-to-market strategy.
Niche market discovery: Search for products or services adjacent to your offering. The businesses ranking for those terms are potential partnership candidates, resellers, or referral sources.
Content gap analysis: Search for questions or topics in your space and see which businesses are ranking for informational content. If a competitor dominates the “how to” queries in your niche, that’s a content opportunity to address.
Supplier discovery: Search for “[product type] wholesale supplier [location]” to find vendors — the same workflow used for outbound sales can equally be used for procurement research.
Scaling and Upgrading the Workflow
Run multiple searches in one pass: Instead of a form trigger, read a list of search terms from a Google Sheet using a “Read Rows” node at the start, then loop through them. One workflow run covers your entire search term list and populates the master sheet with all results.
Increase results per page: The 10-result default is enough for a quick test but too limited for real prospecting. Bump resultsPerPage to 30, 50, or even 100 for comprehensive coverage of each query. Be aware that Google SERP data quality tends to drop after position 20–30 for most local queries.
Add website enrichment: After the business classification step, add a Firecrawl or HTTP Request node to actually visit each URL and scrape the contact page. This can surface email addresses, phone numbers, and physical addresses that aren’t available from the SERP snippet alone.
Add Perplexity research: For high-priority leads, pipe the URL into a Perplexity search to get current company news, size estimates, and recent activity — similar to the enrichment layer in the Google Maps scraper workflow.
Switch to the native Apify node: If you built this workflow using HTTP Request nodes, migrate to the @apify/n8n-nodes-apify community node. You eliminate the Wait node, simplify the credential setup, and get access to the newer “Run Actor and Get Dataset” combined operation that handles everything in one step.
Tips and Common Issues
20 seconds may not be enough for large scrapes. When you increase resultsPerPage to 50 or 100, the actor takes longer to complete. Increase the Wait node duration to 45–60 seconds for larger jobs, or switch to the native Apify node which waits dynamically rather than using a fixed pause.
The AI classification is an inference, not a fact. GPT-4o mini classifies businesses based on their title, URL, and meta description — it doesn’t visit the website. For unusual brand names or sparse meta descriptions, the classification may be inaccurate. Treat it as a first-pass filter to help your sales team prioritize, not as definitive categorization.
Search results are a snapshot in time. Google’s SERP changes constantly. A business ranking #3 today may not appear at all next month. Run this workflow regularly (monthly or quarterly) and include the scrape date in your sheet so your team knows how current the data is.
Local pack results vs. organic results. The Google Local Pack (the map + 3 business listings at the top of local searches) is separate from organic results. The SERP scraper captures organic listings; for local pack data, consider using the Google Maps Scraper actor instead — or combine both for full SERP coverage.
Mind your Apify credits. Each Google SERP scrape costs a small amount of Apify credits. At 30 results per search × 20 searches, you’re running 600 result fetches. Stay aware of your usage, especially when testing different parameter combinations.
